Licensing Registration and Editing
Menu → Licensing
In this article, you will have access to information on:
To view, register, or edit the licensing of film or series rightsgo to the Licensing in the page in the Main MenuYou will see the main page with the Licenses already registered:
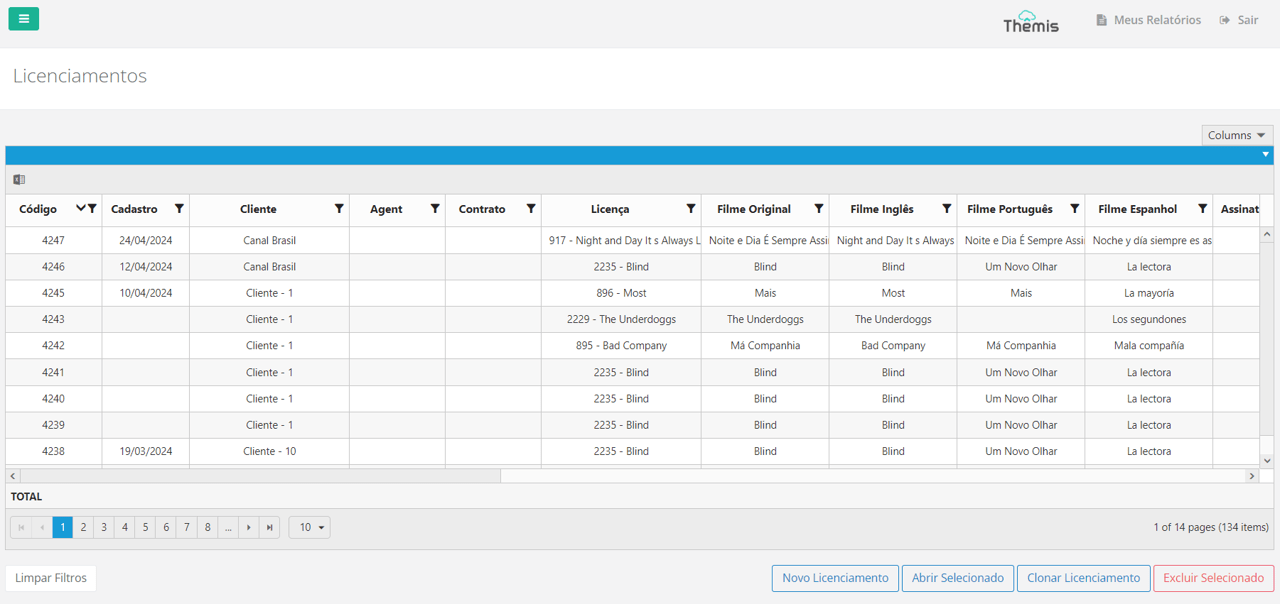
Consulting Licenses
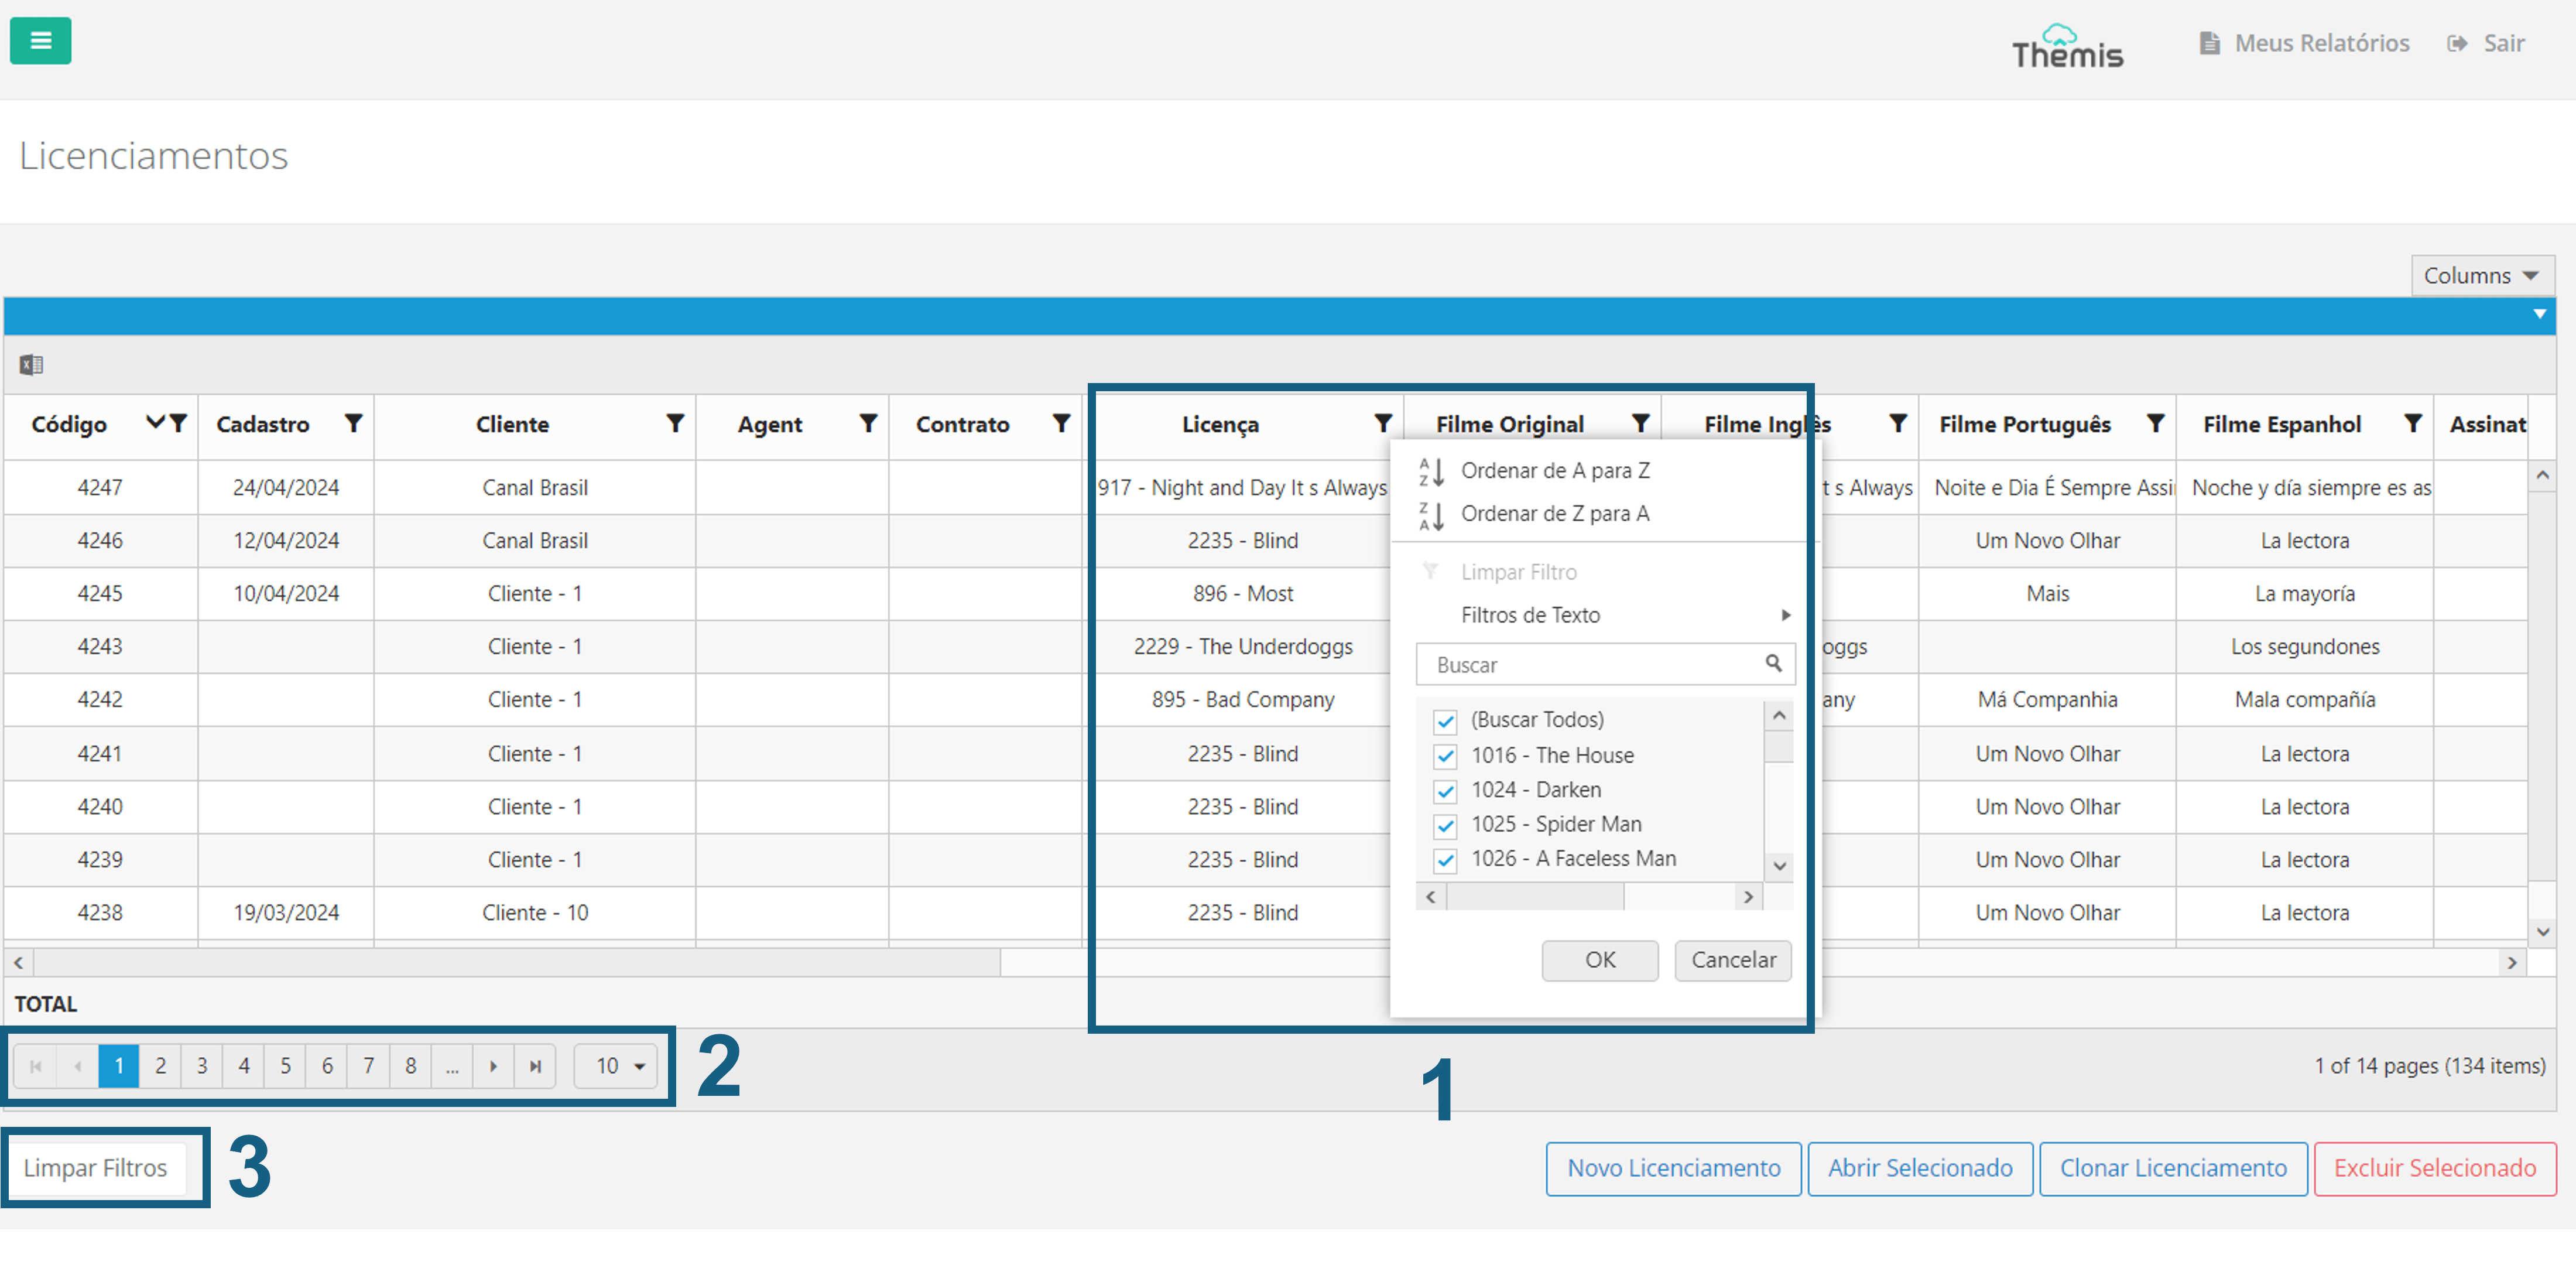
To consult a specific Licensing, you can use the following resources:
Column Filter: In each column, click the "filter" icon to order, select, or search for an item.
Page Menu: Navigate through the title pages.
Clear Filters: Clear all applied filters at once.
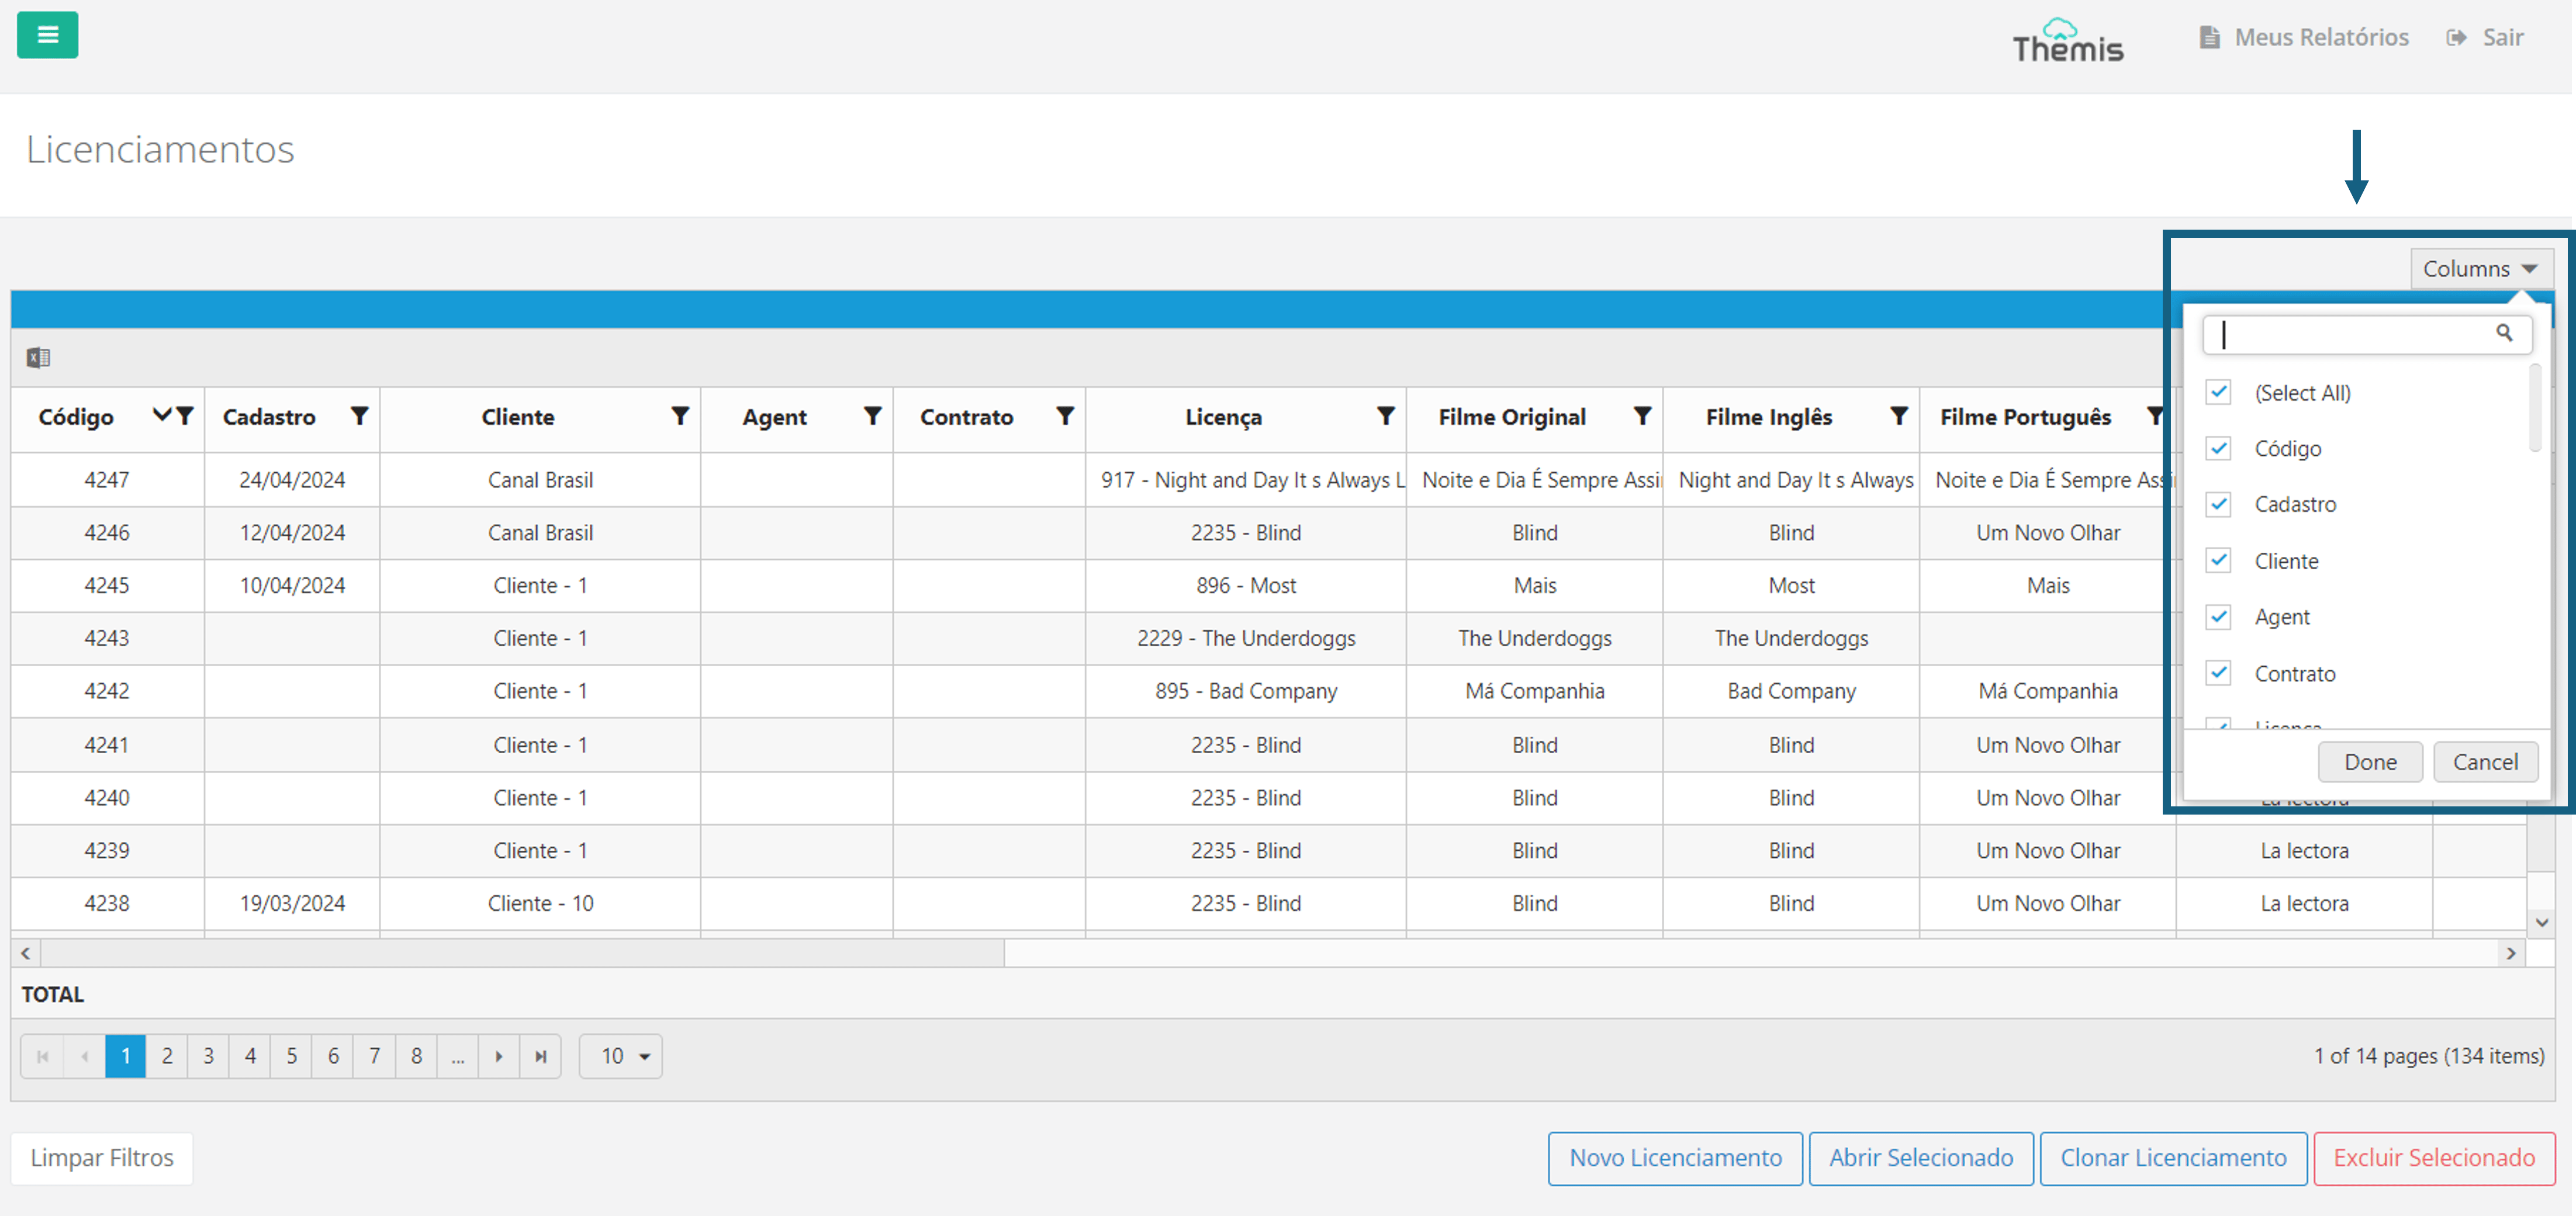
You can also select which columns to view through the **Columns** menu located at the top right corner of the page:
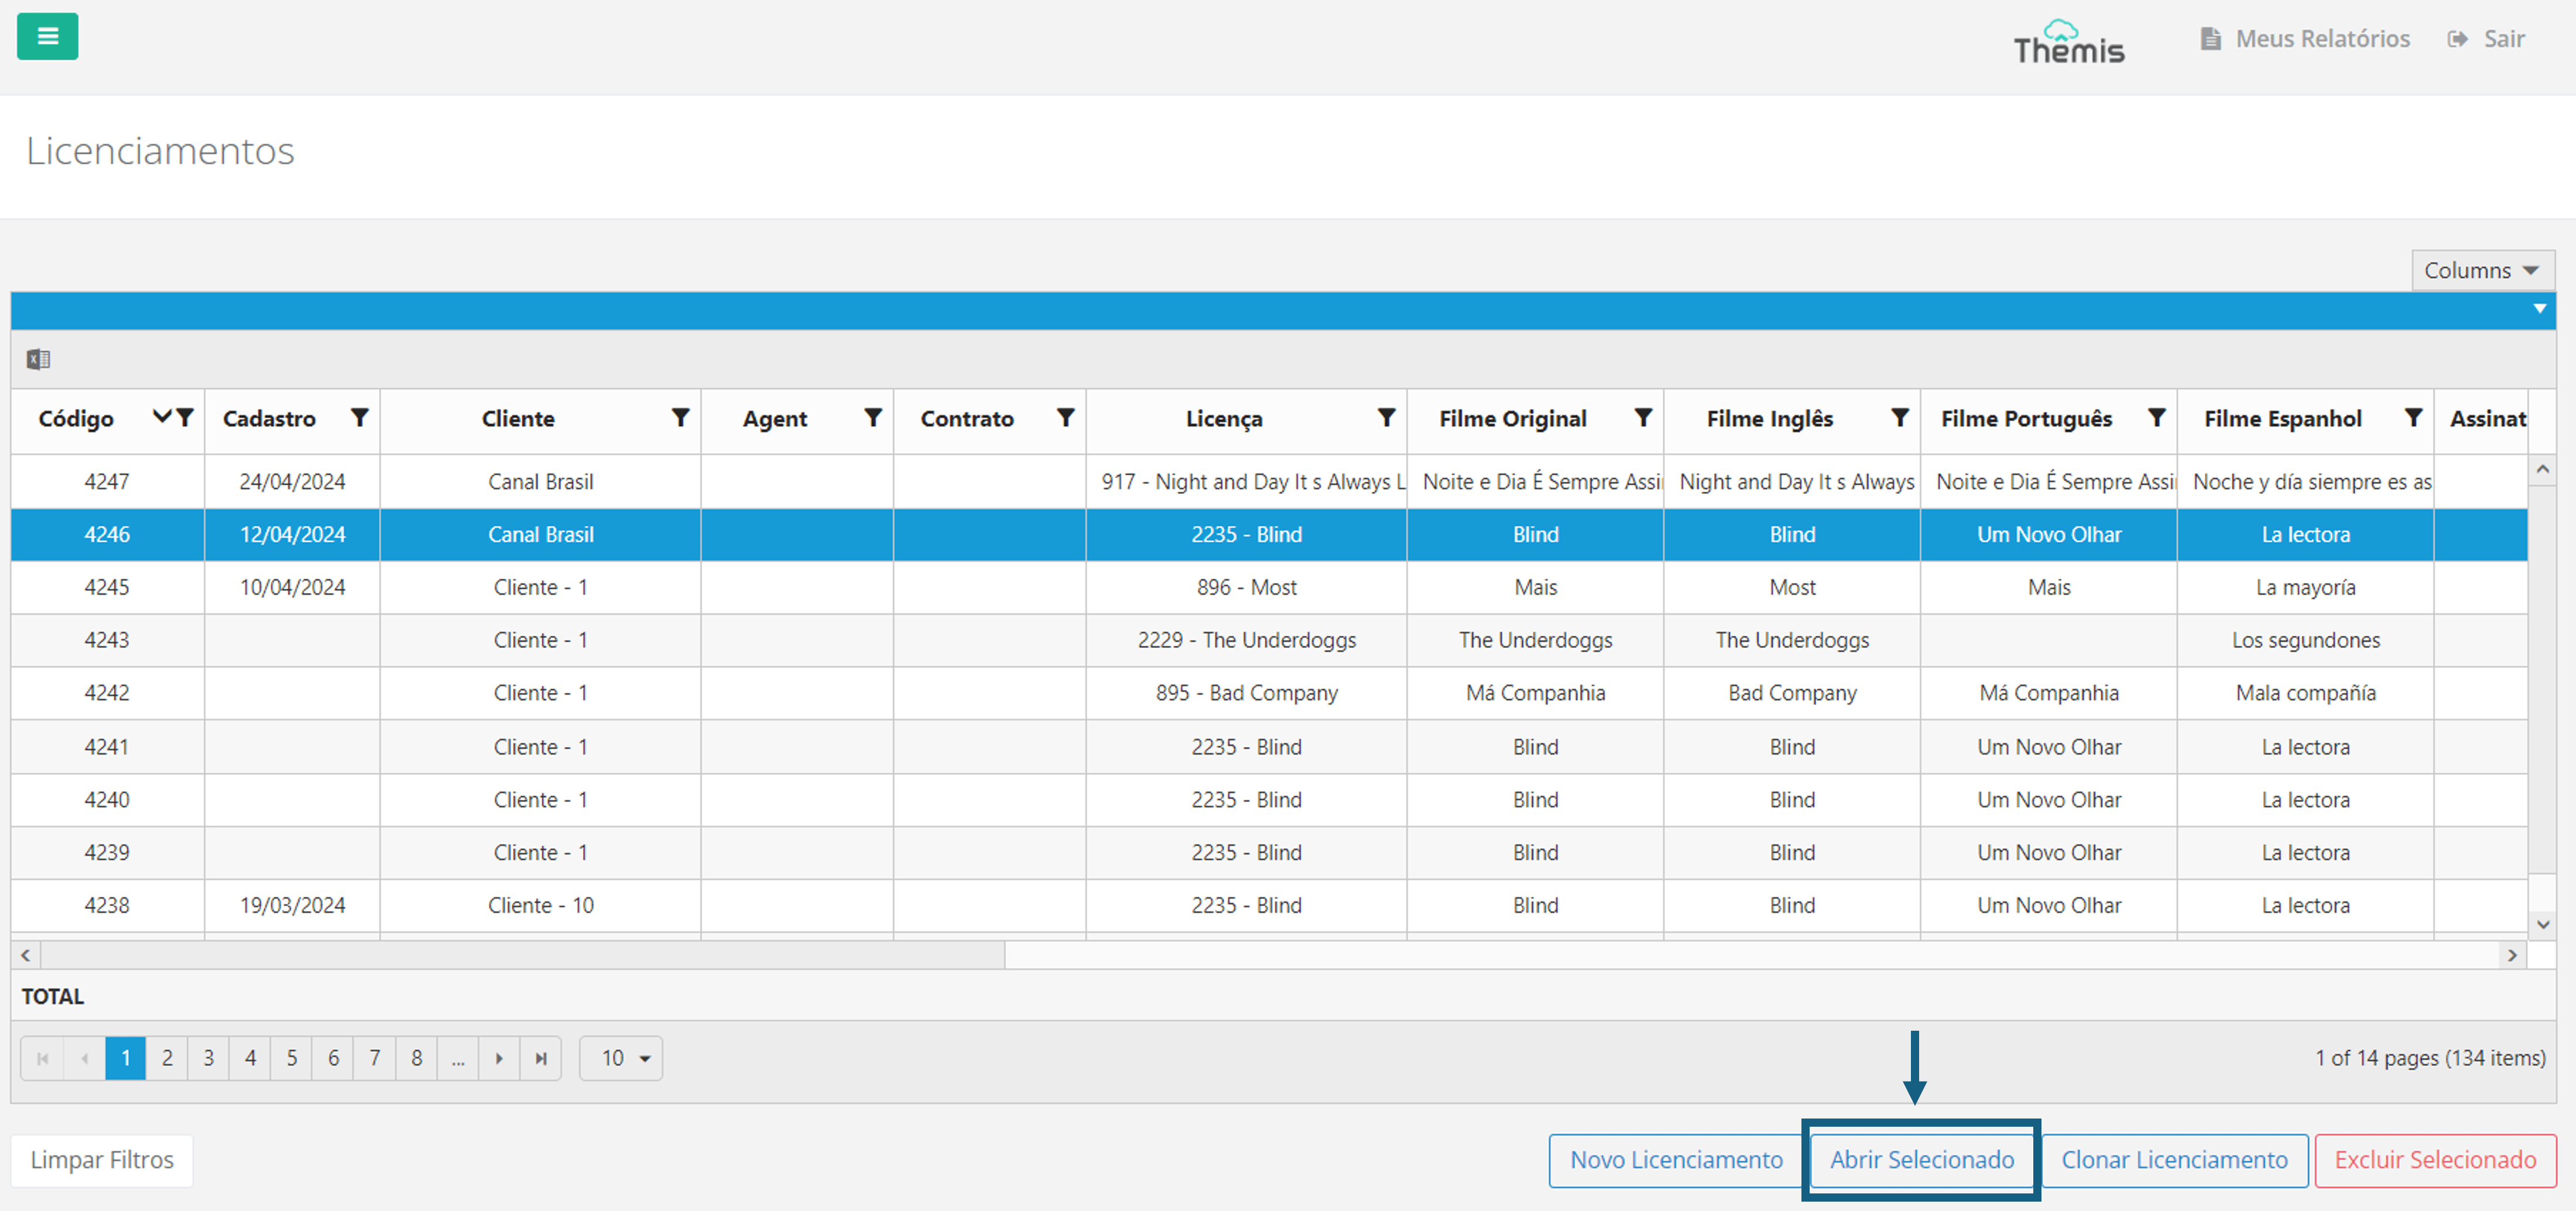
Once you find the Licensing you want to view details for, select the title and click "Open Selected" or double-click the desired Licensing:
A new tab will open with all the Licensing details:
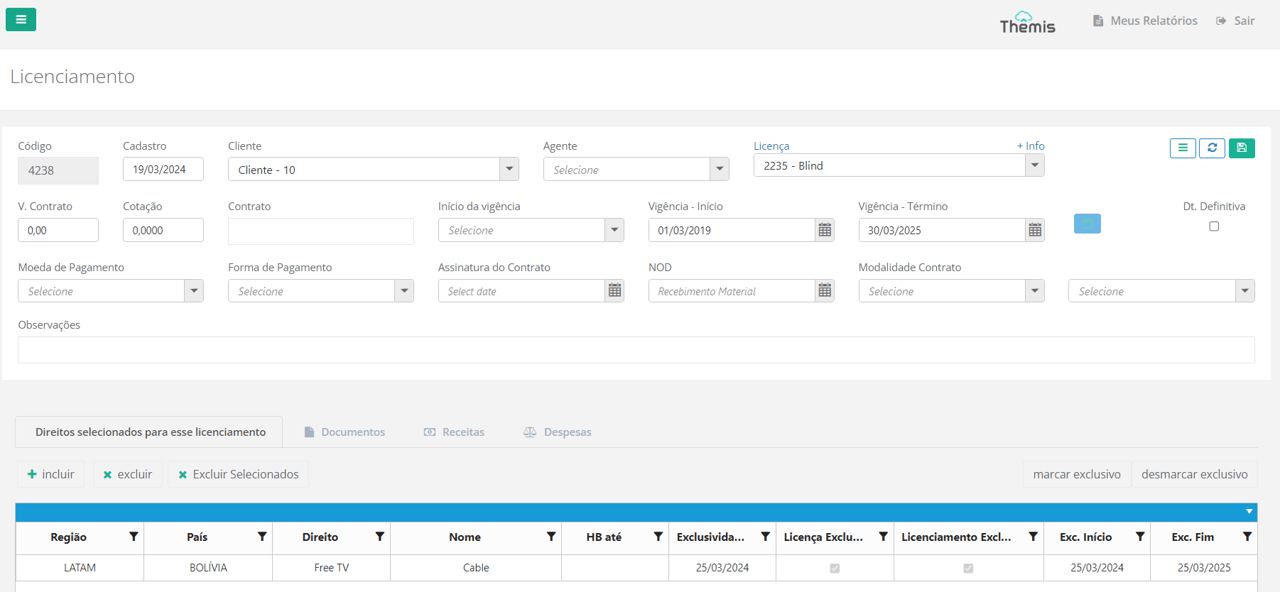
See below in License registration, the details of each of the fields on the License details page.
Exporting Licensing Reports to Excel
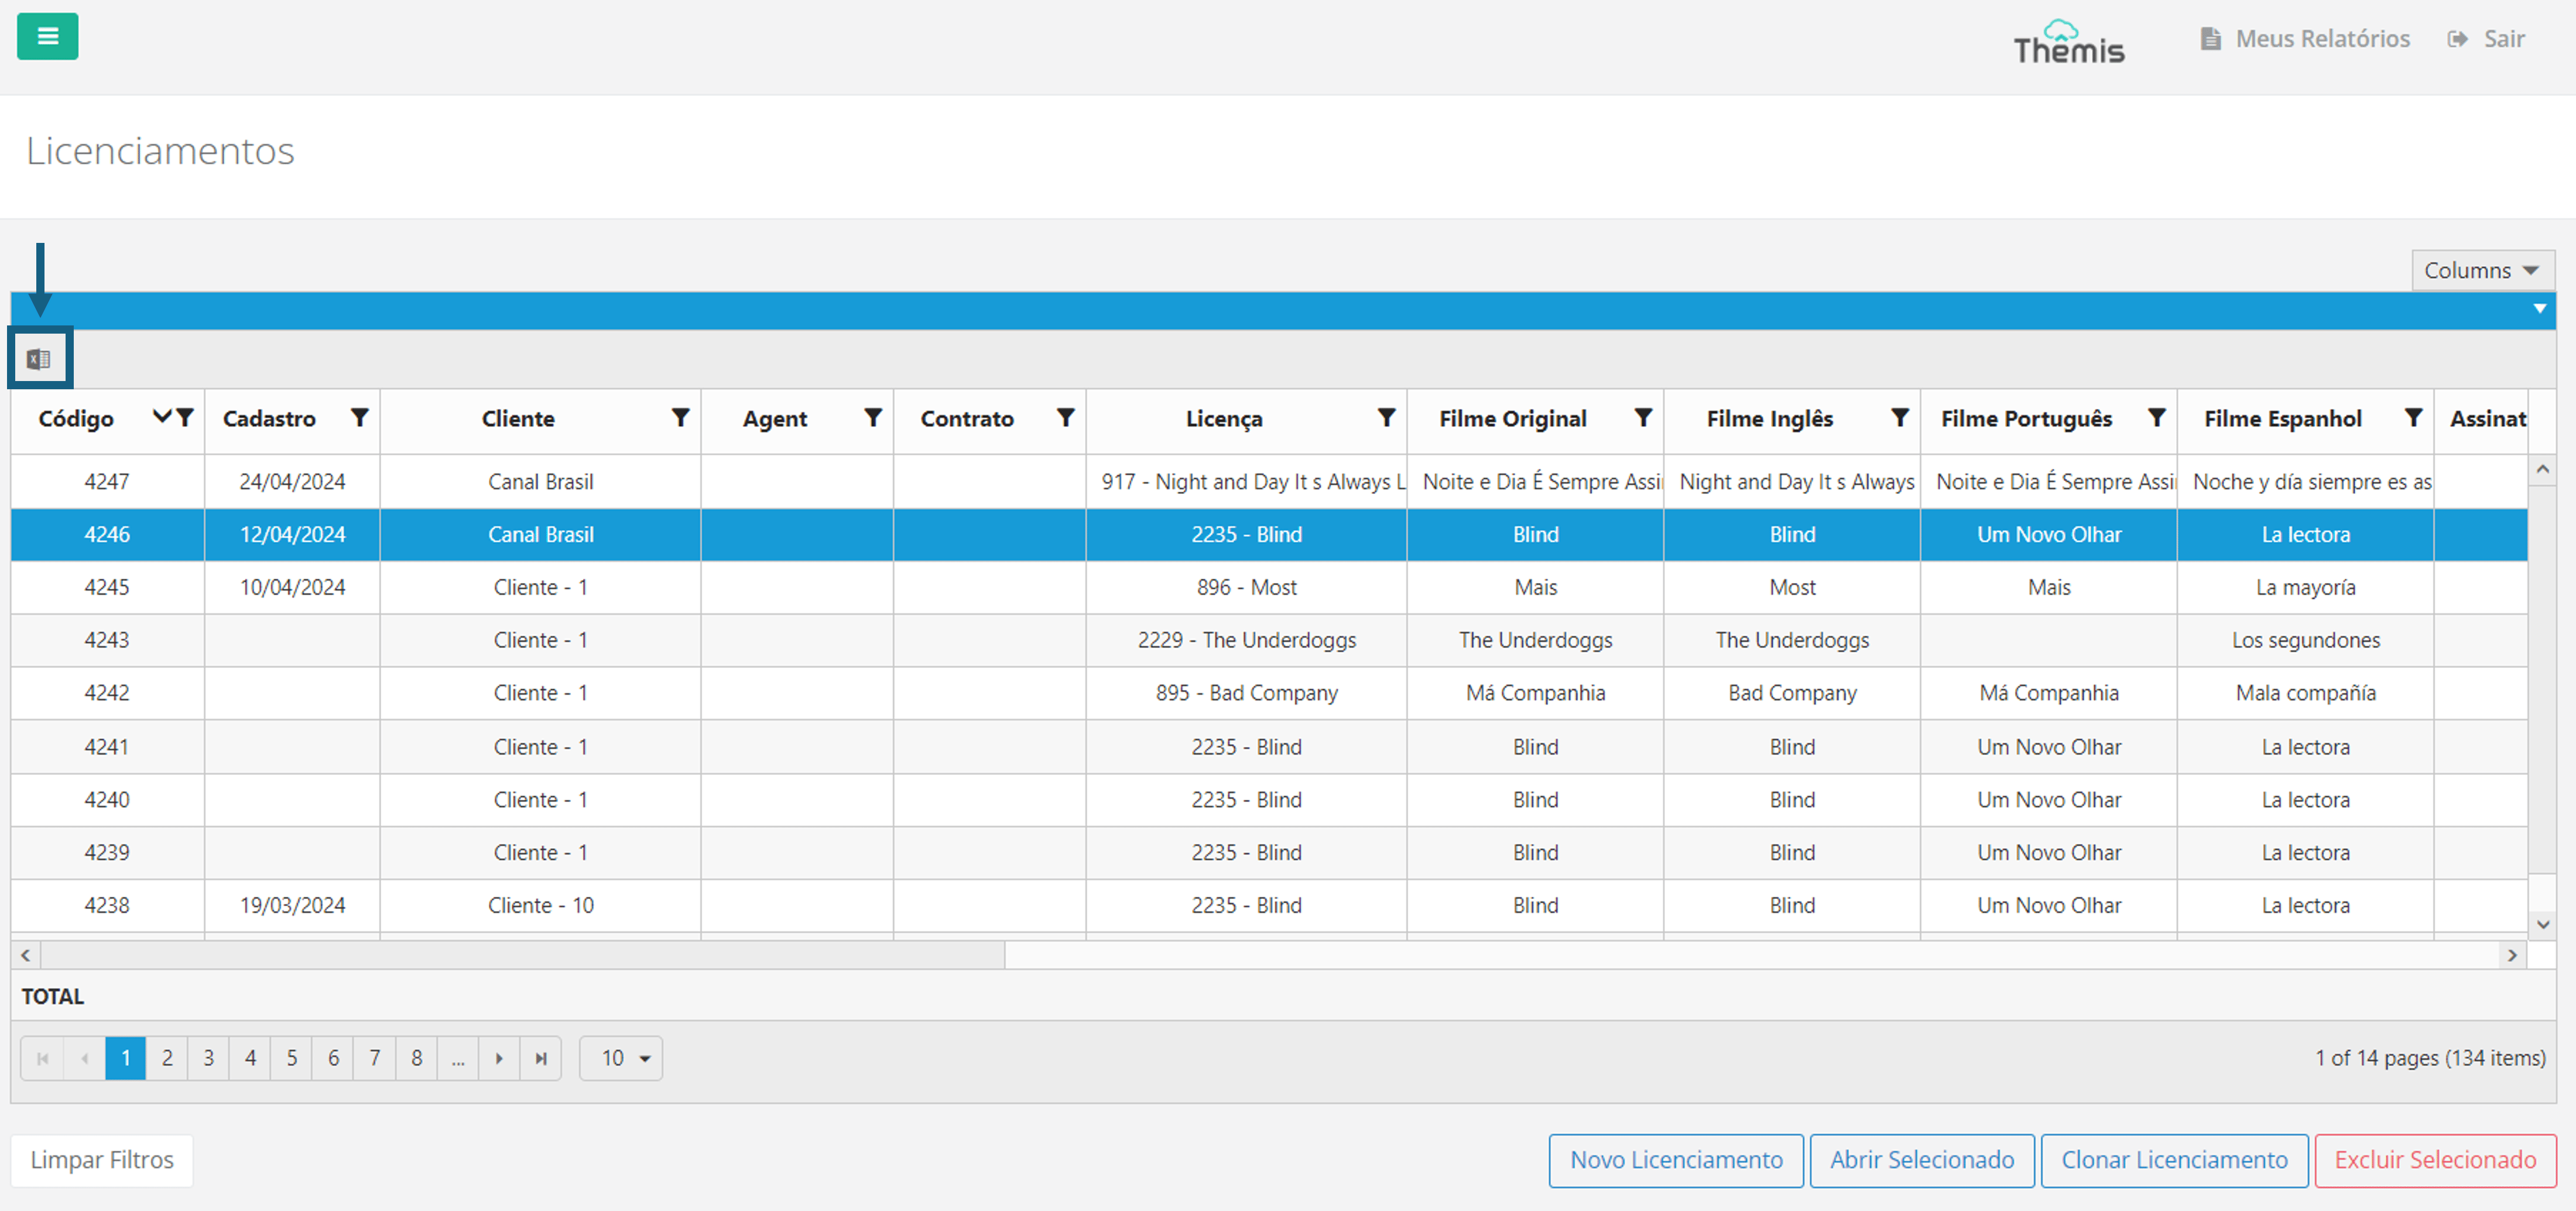
On the **Licensing** homepage, you can export the entire list displayed on the screen. You can customize the export by applying filters and choosing which columns to display. As explained above, in the topic Consulting Licenses section, follow the customization process. Then, click the "Excel" icon located in the top left corner of the screen. The download will start automatically:
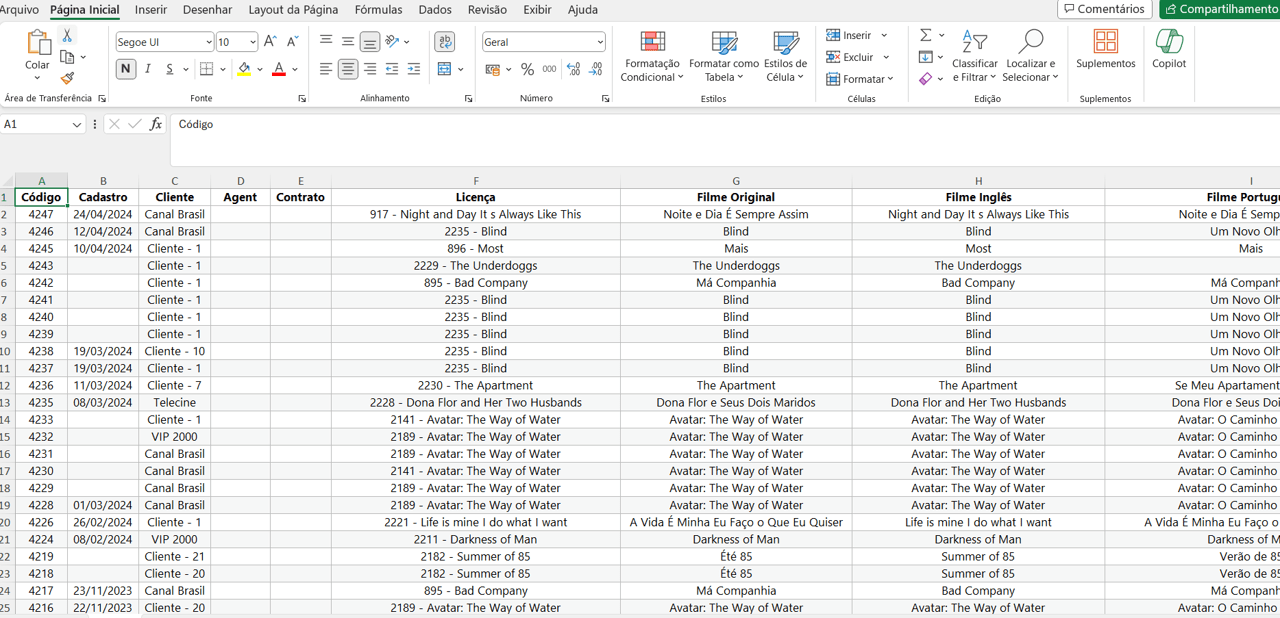
The exported report will look like the example below:
Registering a New Licensing
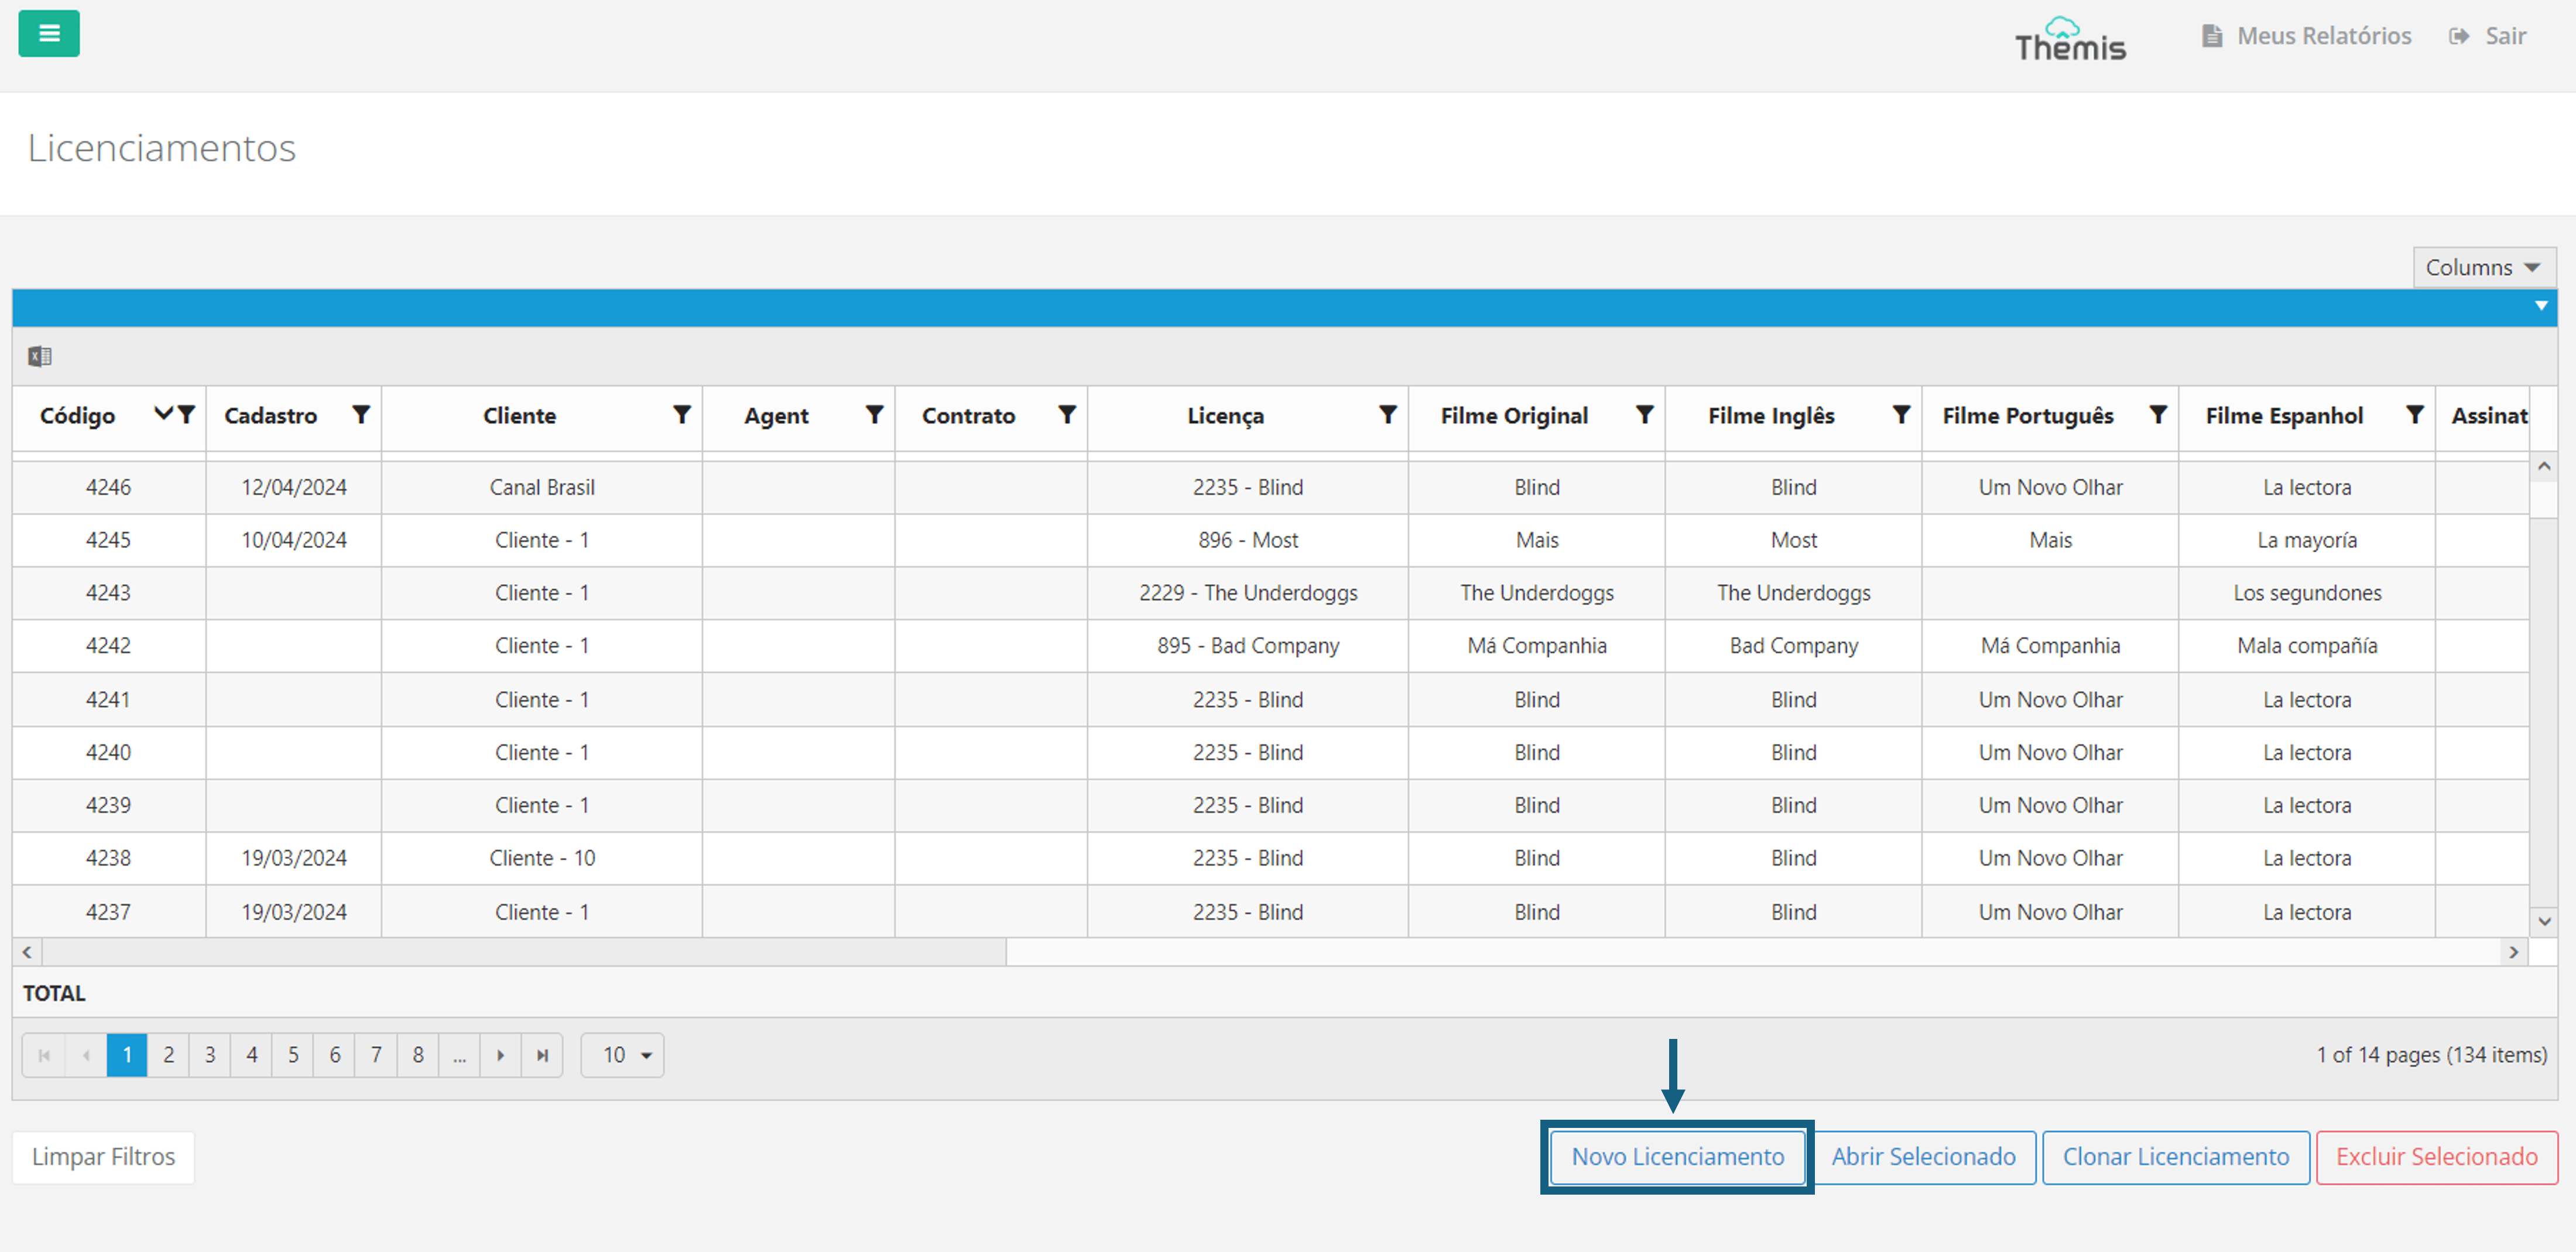
1. To register a new Licensing for the rights of a film or series, access the **Licensing** homepage and click "New Licensing":
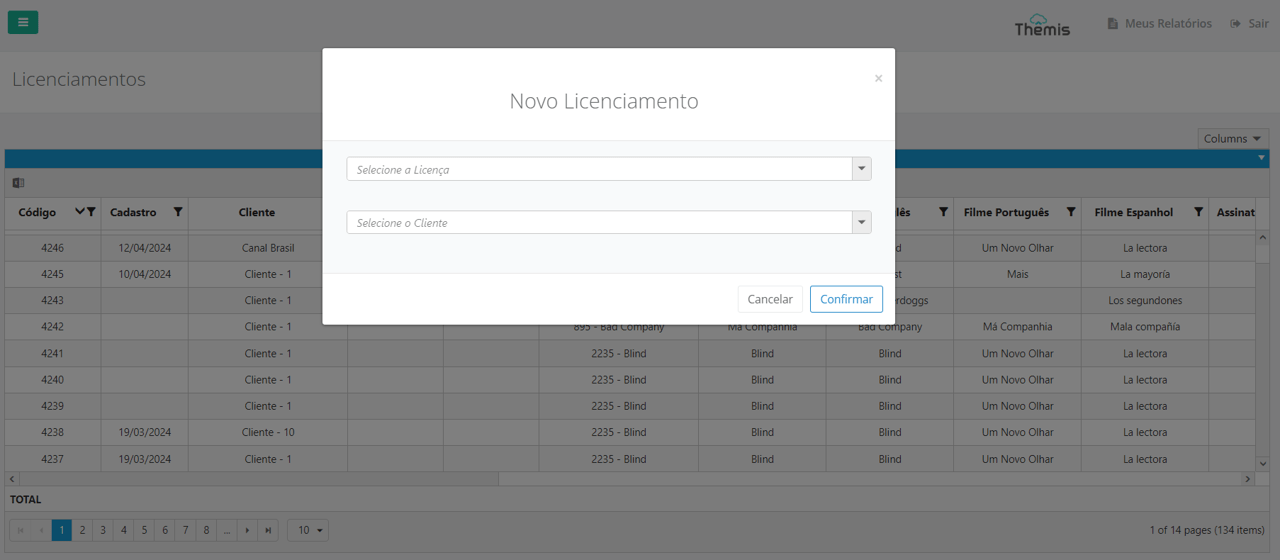
2. A pop-up window will appear for you to fill in the initial requested fields: Client: The client acquiring the license. License:Which license will be acquired
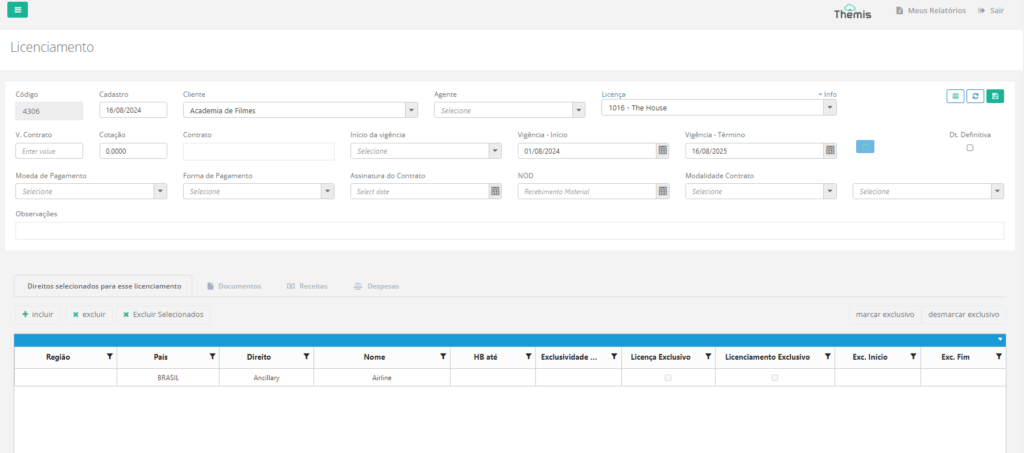
3. The **Licensing Editing** page will open. Let’s break down the highlighted fields from the image below:
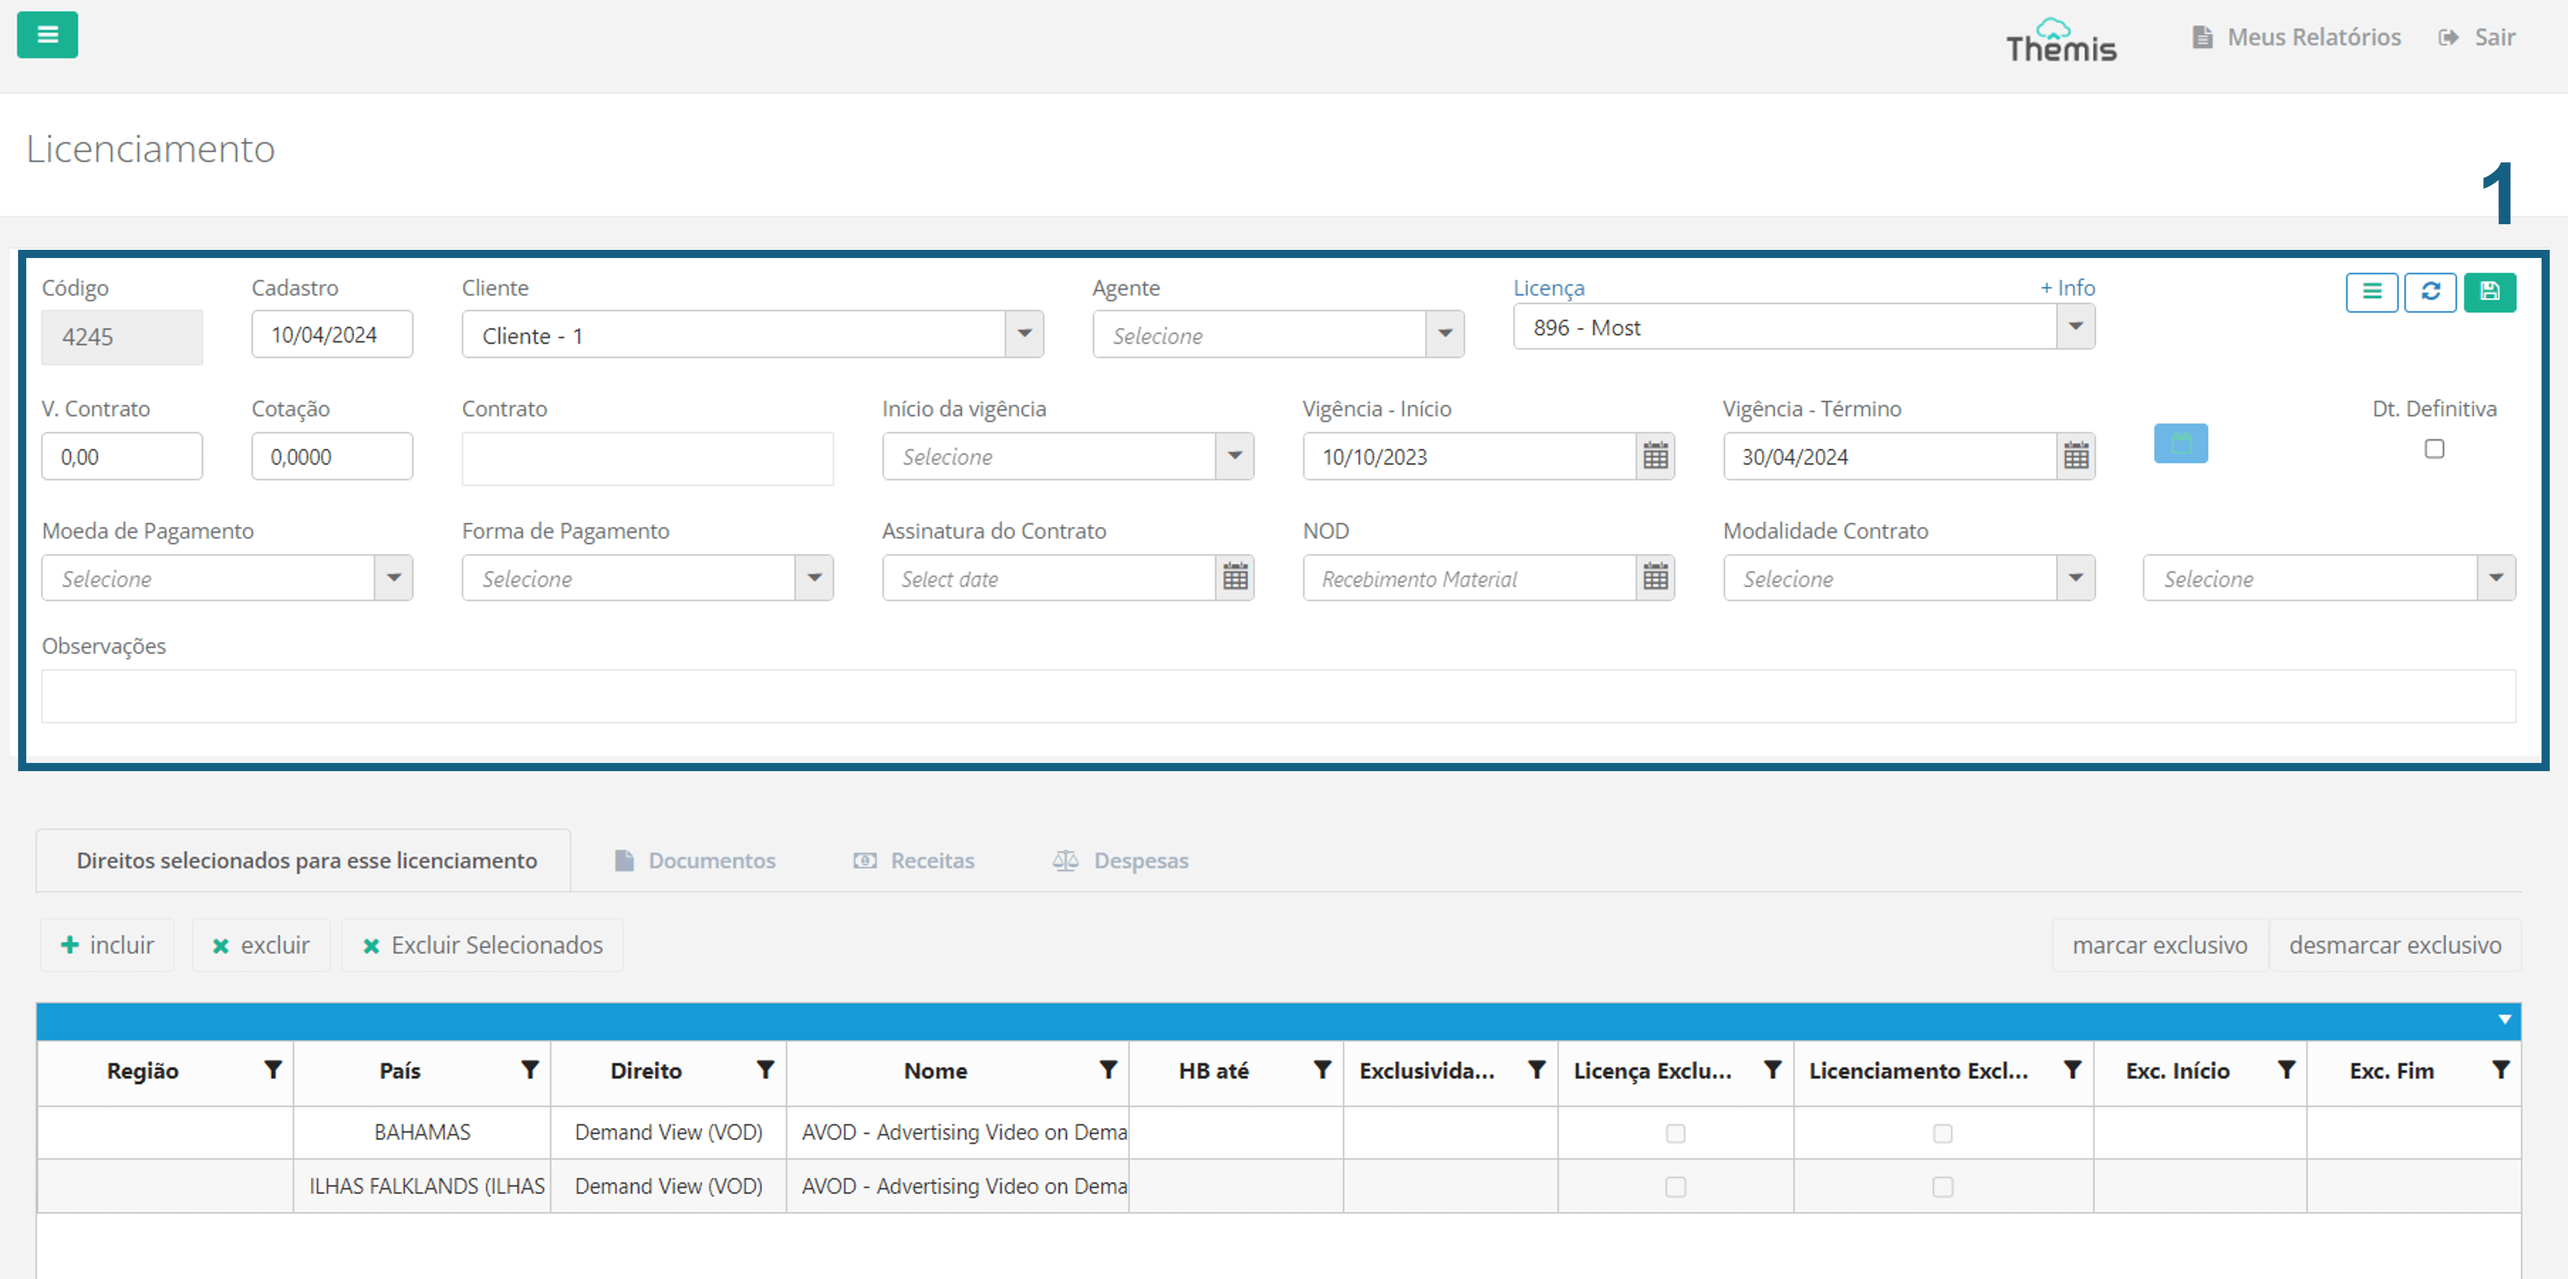
- Code: Automatically filled by the system without editing options.
- Registration Date: Select the licensing registration date.
- Client: Confirm if the client is correct.
- Agent: Fill in this field if there was an intermediary in the acquisition or sale. click here;
- License: Confirm if the license is correct.
- +Info Above the “License” field, you can click "+Info" to load the information about the Contractor, Duration Start, and Duration End of the License.
- Contract Value: Enter the contract value.
- Payment Currency: Choose the payment currency from the drop-down list.
- Exchange Rate: Enter the exchange rate if applicable.
- Payment Method: Choose between “Gross” or “Net.”
- Contract: Enter any relevant observations regarding the contract.
- Start of Duration: You can link the start of the Licensing term to one of the 5 available options: Signing of Deal Memo, Signing of Contract, Release of Holdback, Receipt of NOD or Other
- Duration Start: Confirm the start date of the licensing contract.
- Duration End: Confirm the end date of the licensing contract.
- Contract Signing: Enter the contract signing date.
- NOD: Enter the date of receipt of the material.
- Contract Type: Choose between "Percentage of Gross Revenue" or "Fixed Price."
- Contract Mode– Complement: Choose between "MG Distribution" or "Flat."
- Observations: Fill in any observations related to the Licensing.
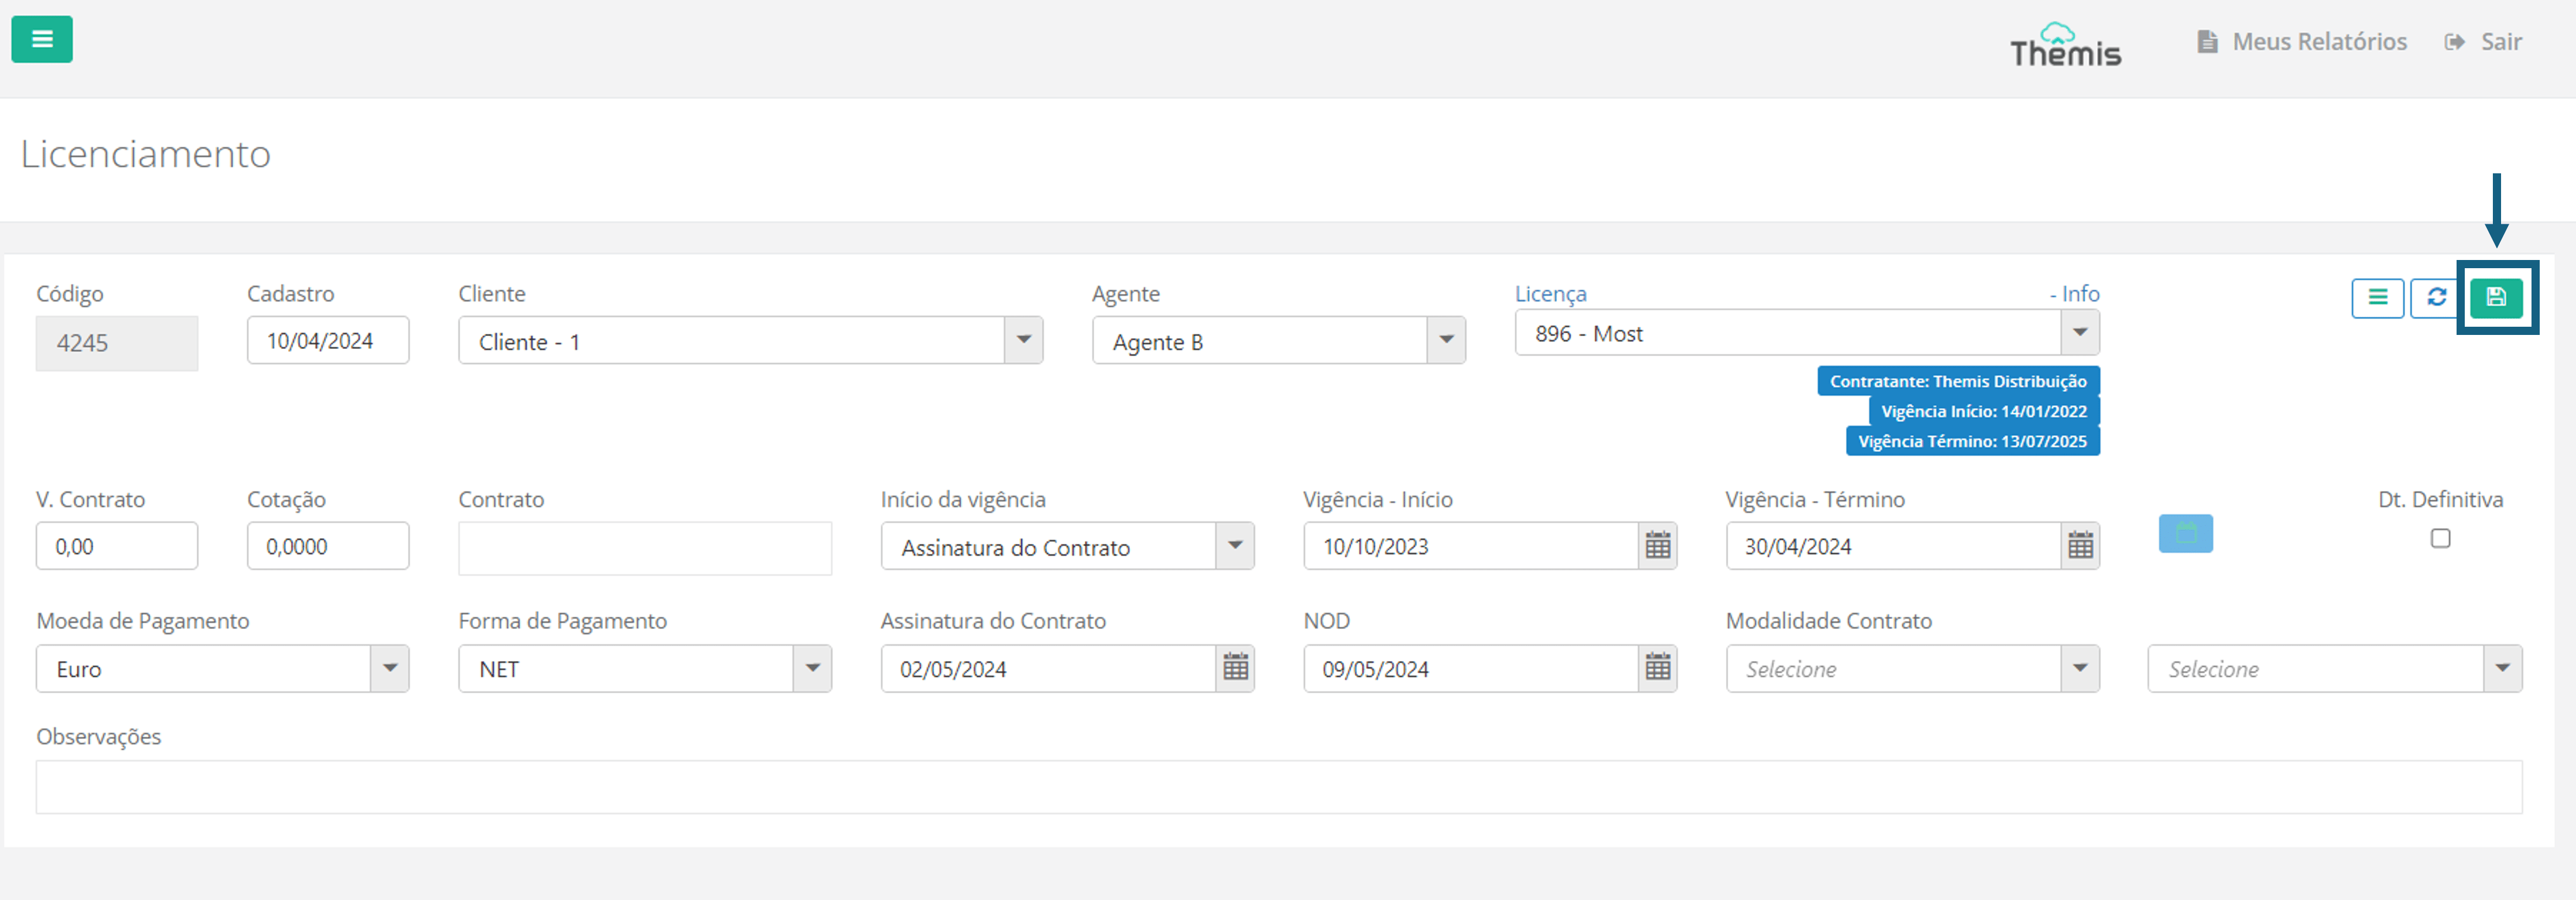
4. After completing all the information, click on the disk icon to save the new Licensing:
Now let's go into detail about each of the tabs, available at the bottom of the screen, to configure the Licensing details. Let's start with the “Selected rights for this license":

- To register a right related to licensing, click on “include”. In the pop-up that will open, you can search for the rights already registered for the title by Region, Country or Law. After filling in one or more fields, click on “Upload”:
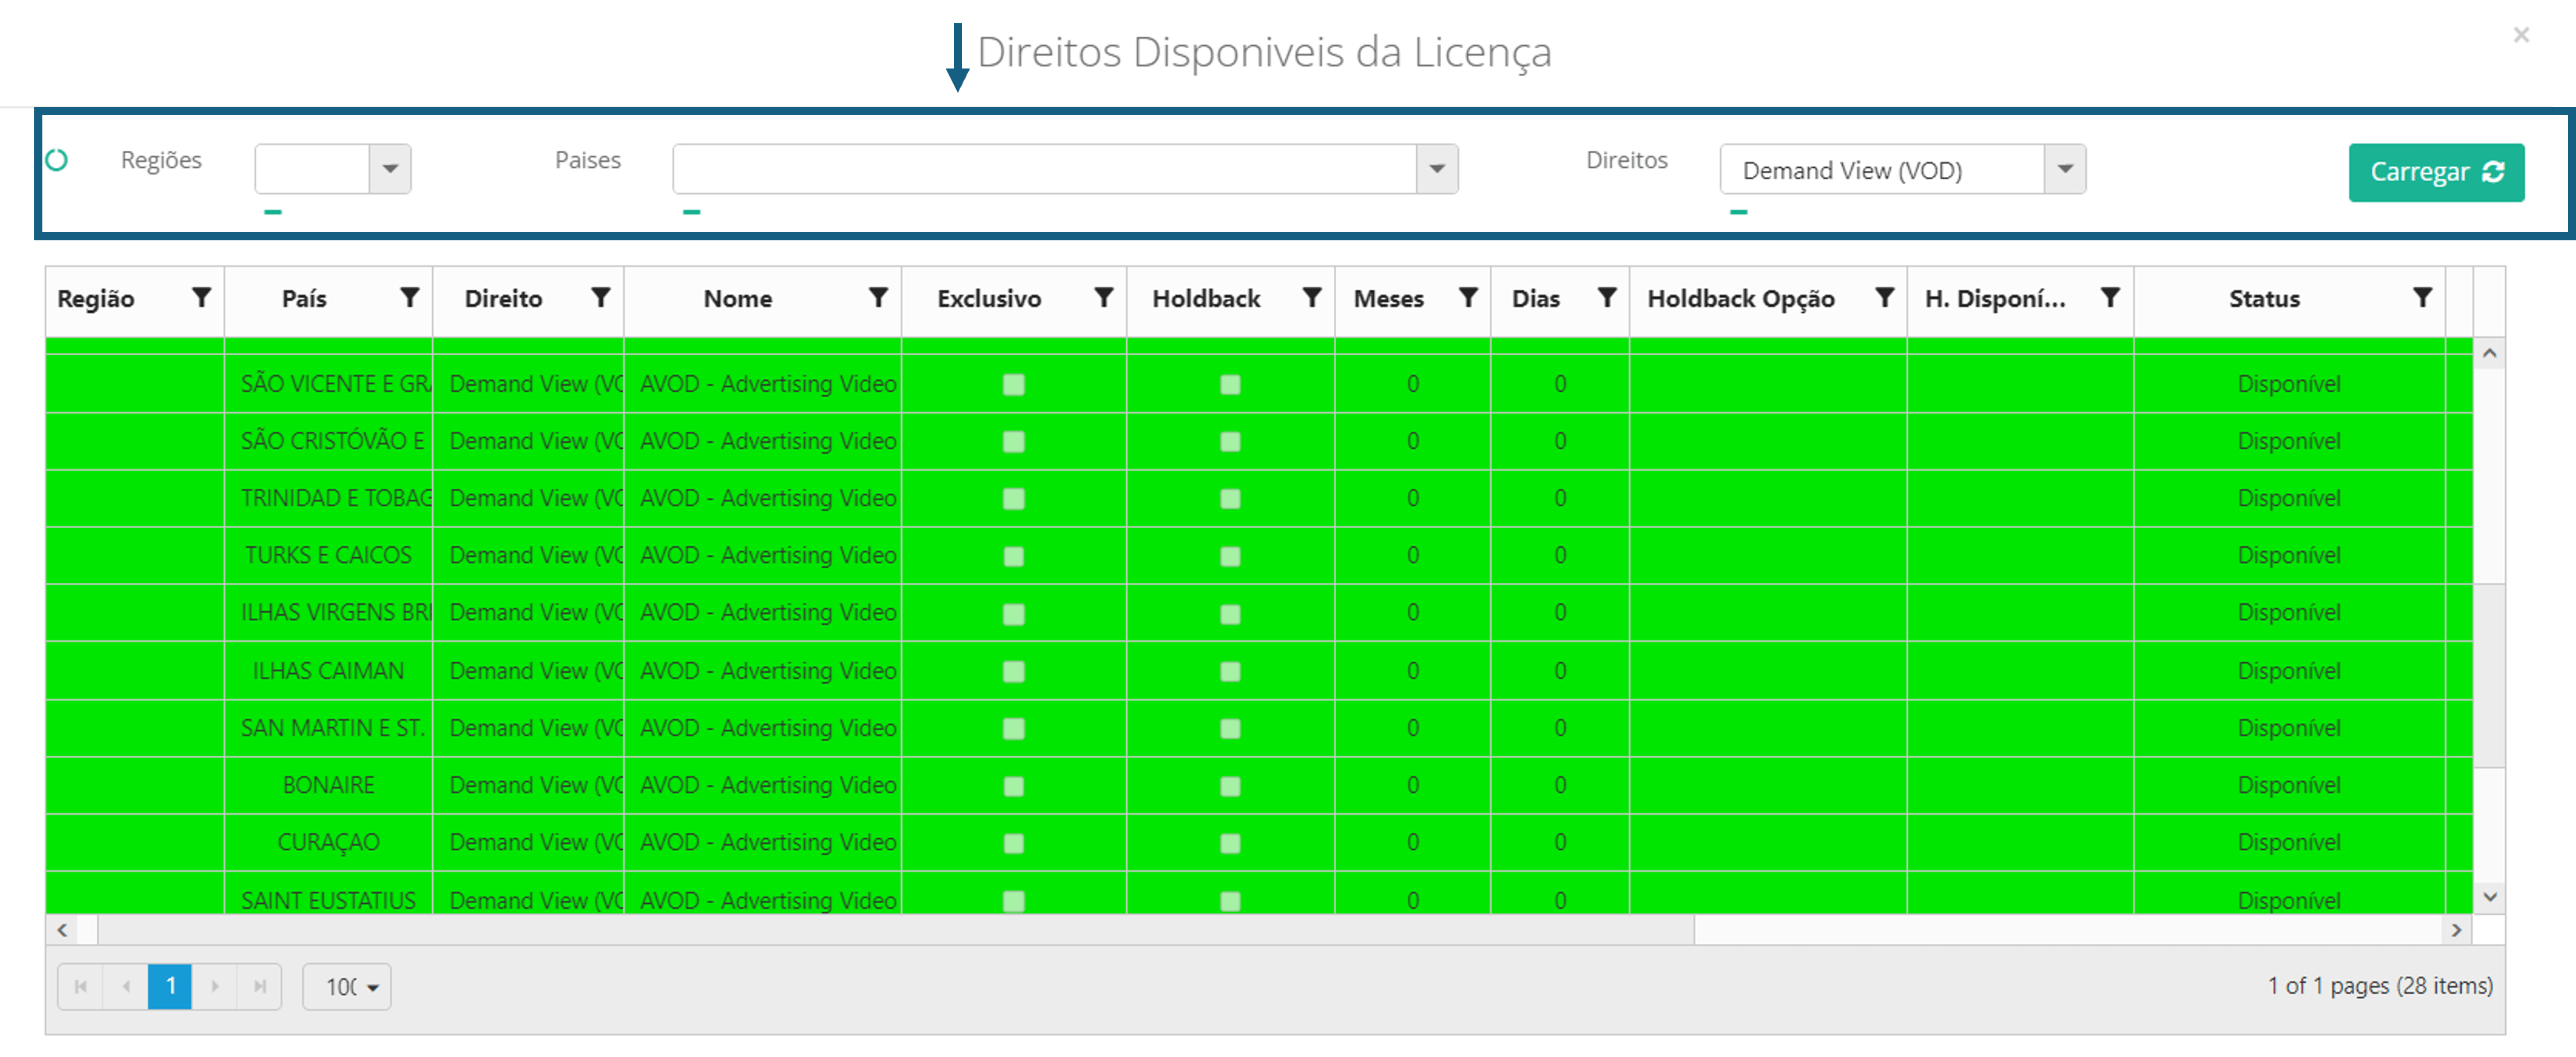
- By loading the Rights list, you can:
- Select the right and click on “Include in Licensing”;
- To select more than one right at a time, you can hold down the “Ctrl” key and click on the rights and when finished click on “include in Licensing”;
- To include all rights in the license, when the list of rights appears, simply click on the “select all” button.
Before To include the right in the Licensing, you can also register the Exclusivity, if that is the case. Just select the “release as exclusive” box and fill in the start and end dates.
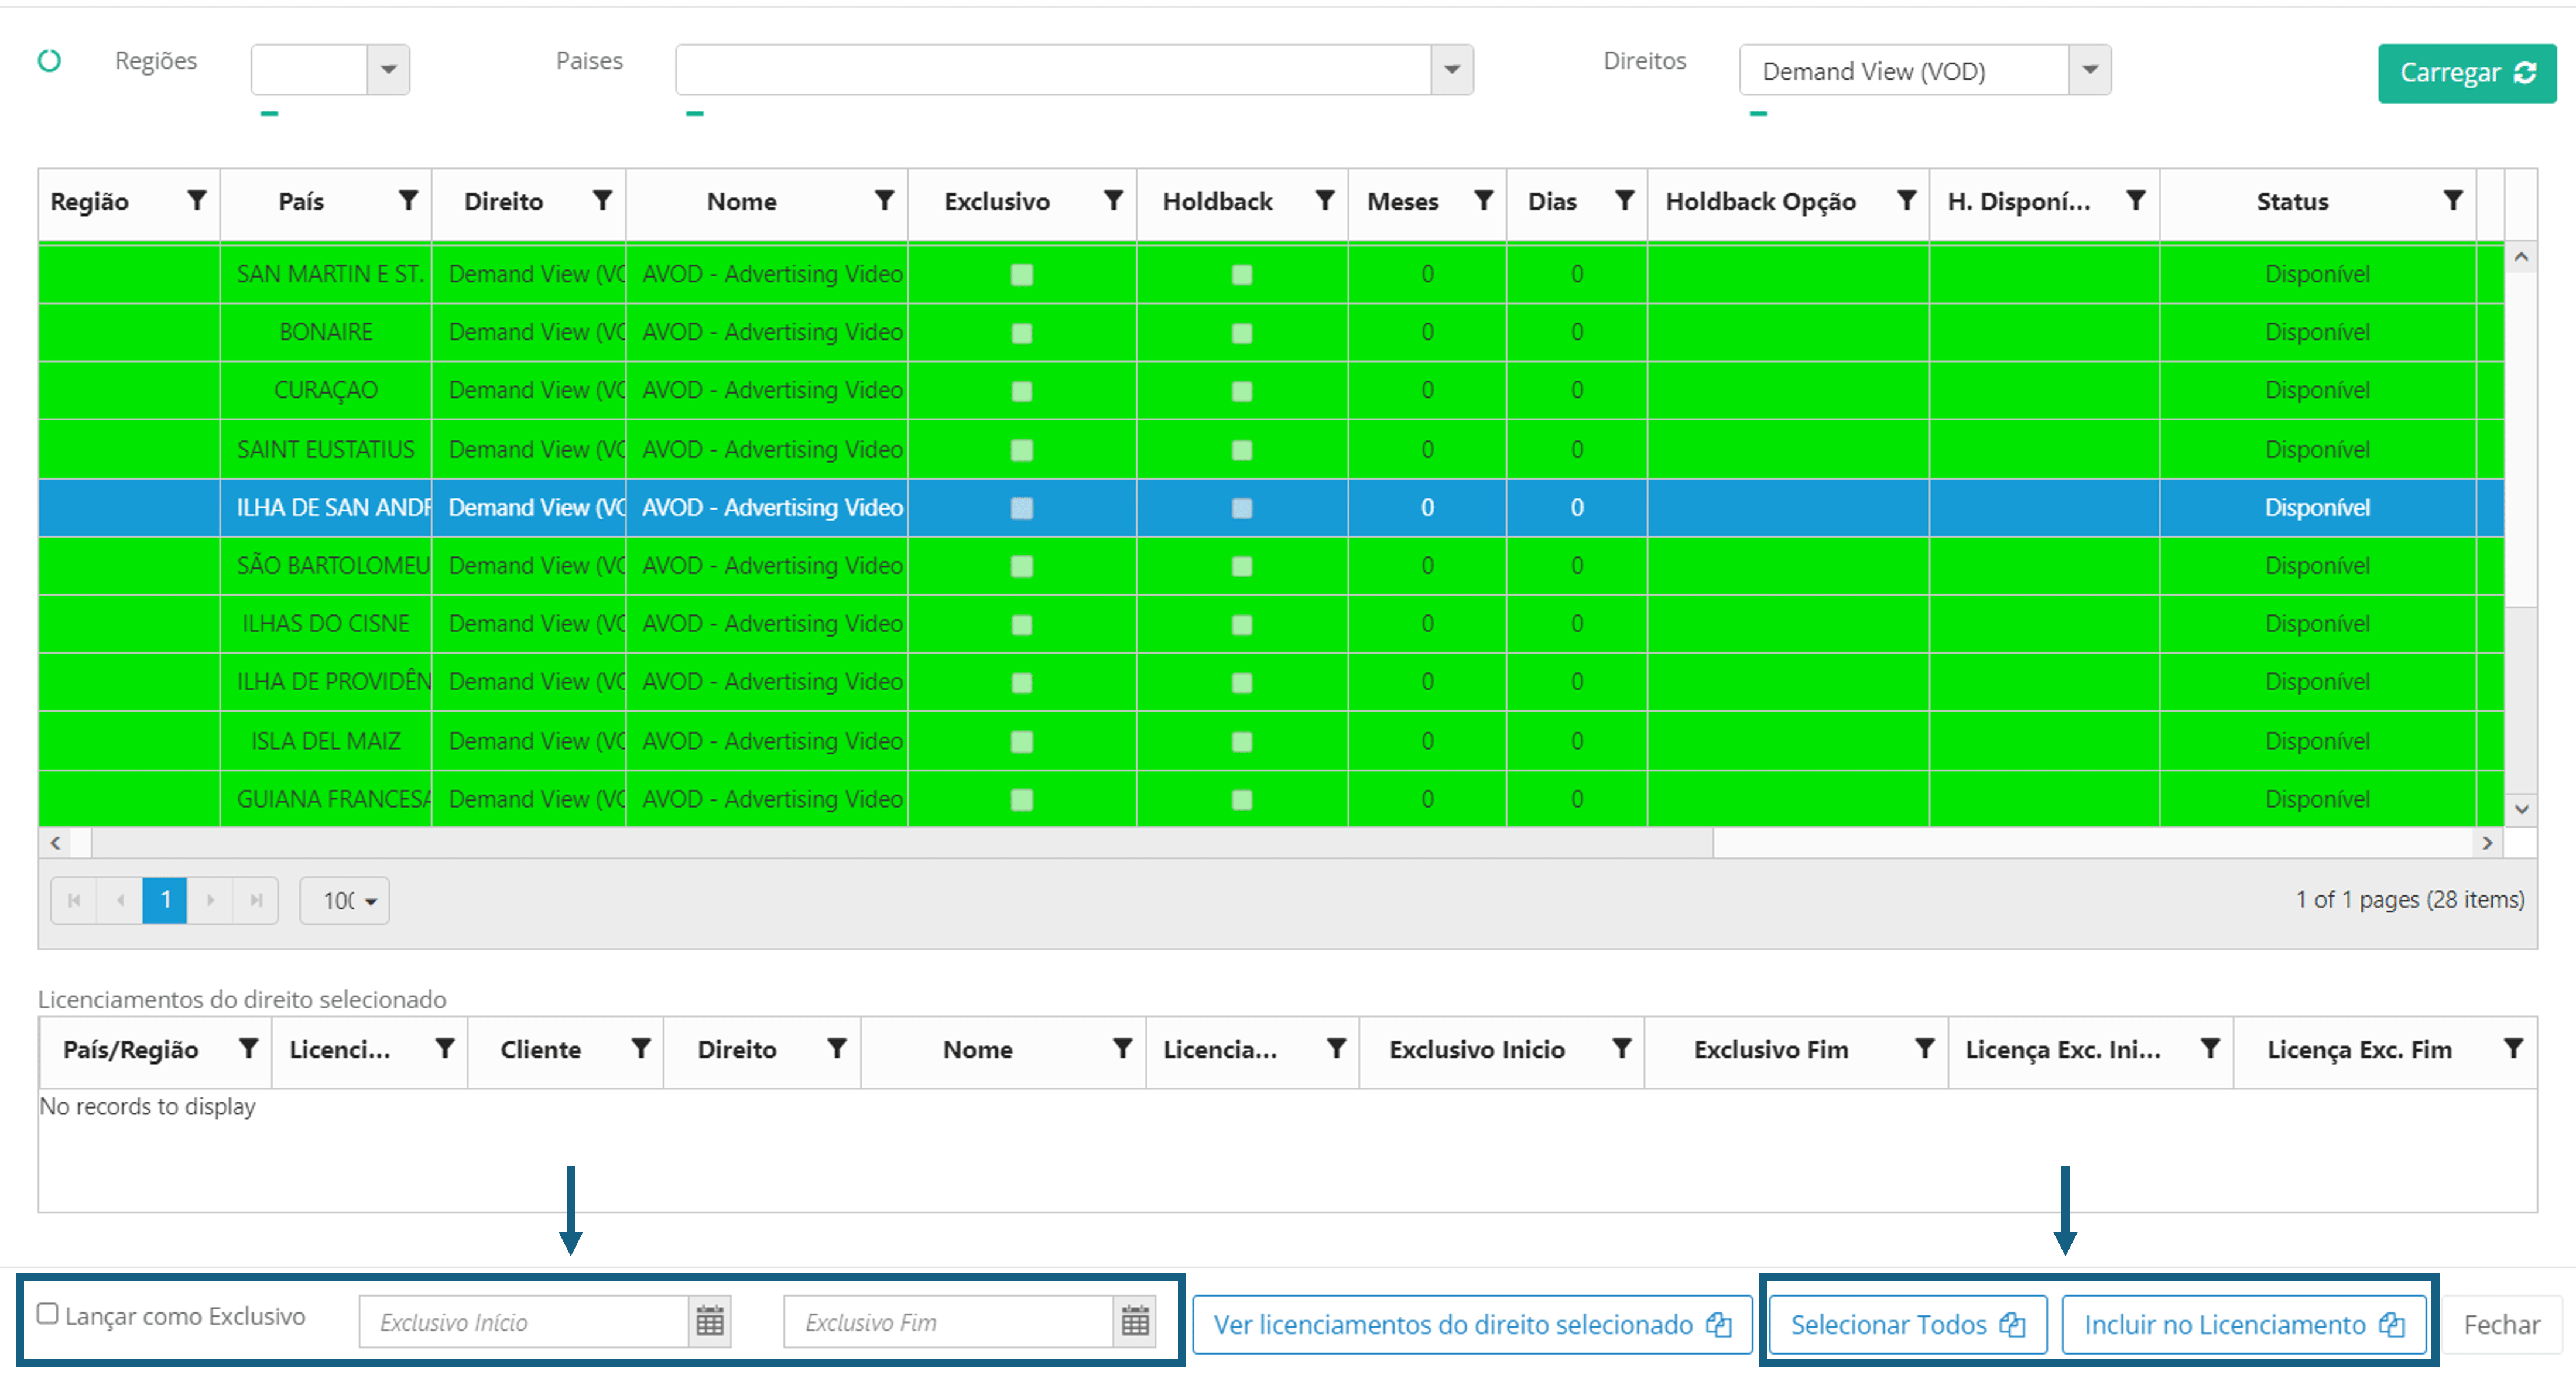
After inclusion, the Licensing rights will appear in the tab list. Selected rights for this Licensing:

- In the tab “documents”, you can upload the contract or any other important document related to the Licensing”. Just click on the “upload” button, select the file on your computer and click open. The file will appear available in the tab after uploading.

- Click here to learn more about the Income and Expenses tab, click here.
Cloning Licenses
To speed up the creation of Licensing, you can clone an existing Licensing to create one that contains the same rights for the same countries. To do this, select the Licensing you want to clone and click on "Clone Licensing":
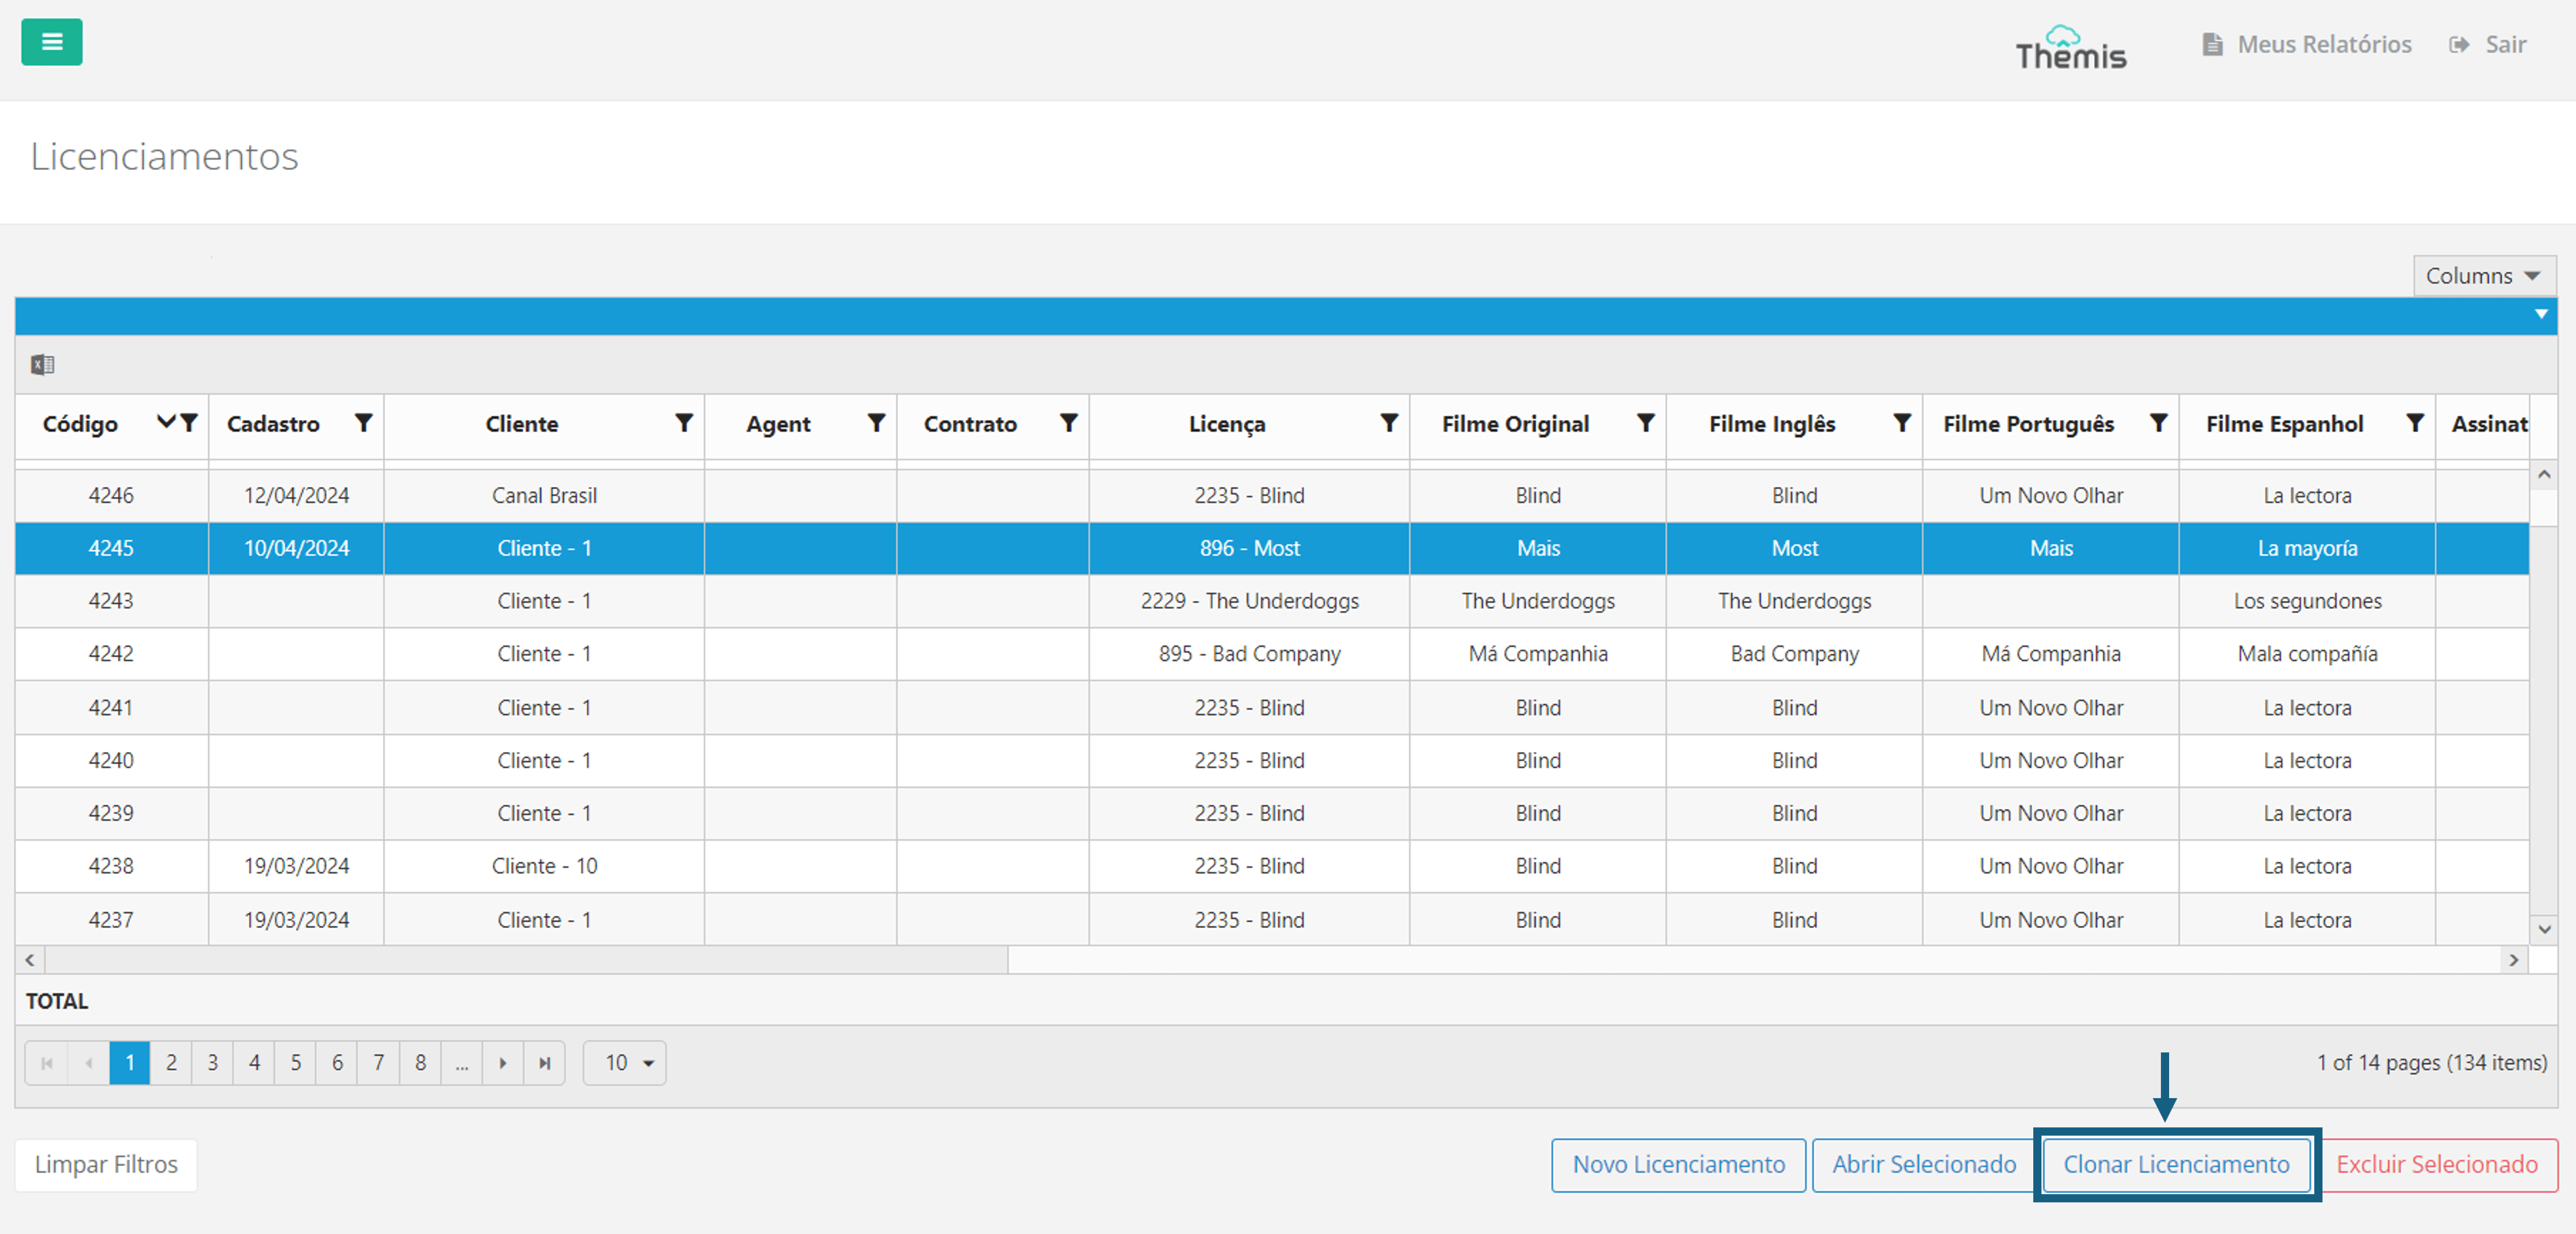
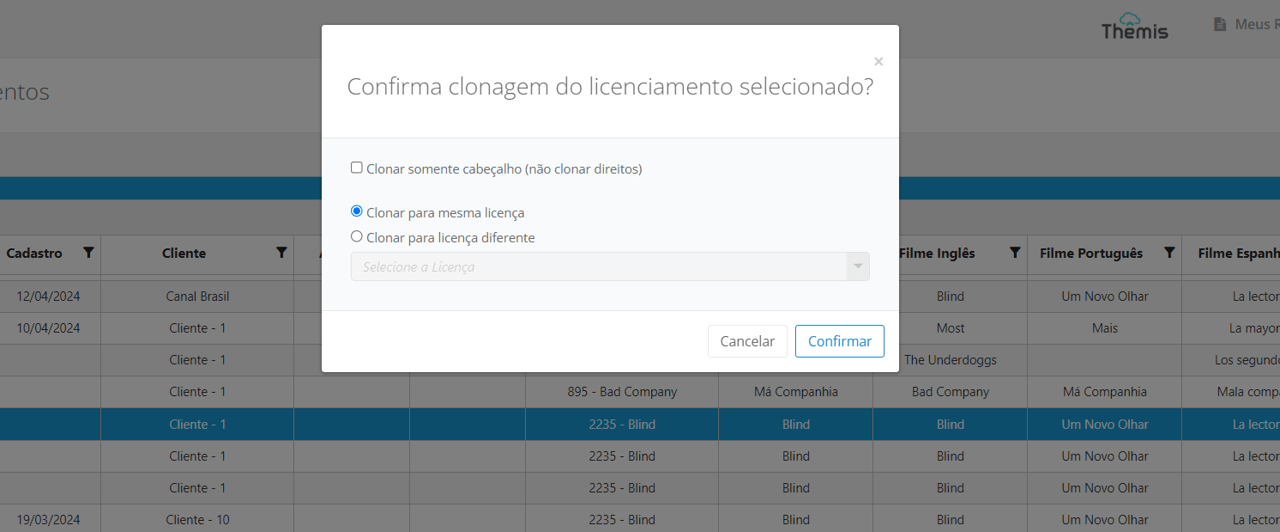
Once the pop-up opens, you can:
- Check the box to "Clone only the header (do not clone rights).
- Choose whether this cloning will be for the same license or for a different license.If you select the second option, search for the License in the drop-down list.
After filling in the necessary fields, click "Confirm."
Creating Licensing via the Rights Licenses Panel
You can also create Licensing for a right through the Rights Licenses Panelin the Main Menu. When accessing the page, search for the title in the Film in English or Film in Portuguese fields and click Load:
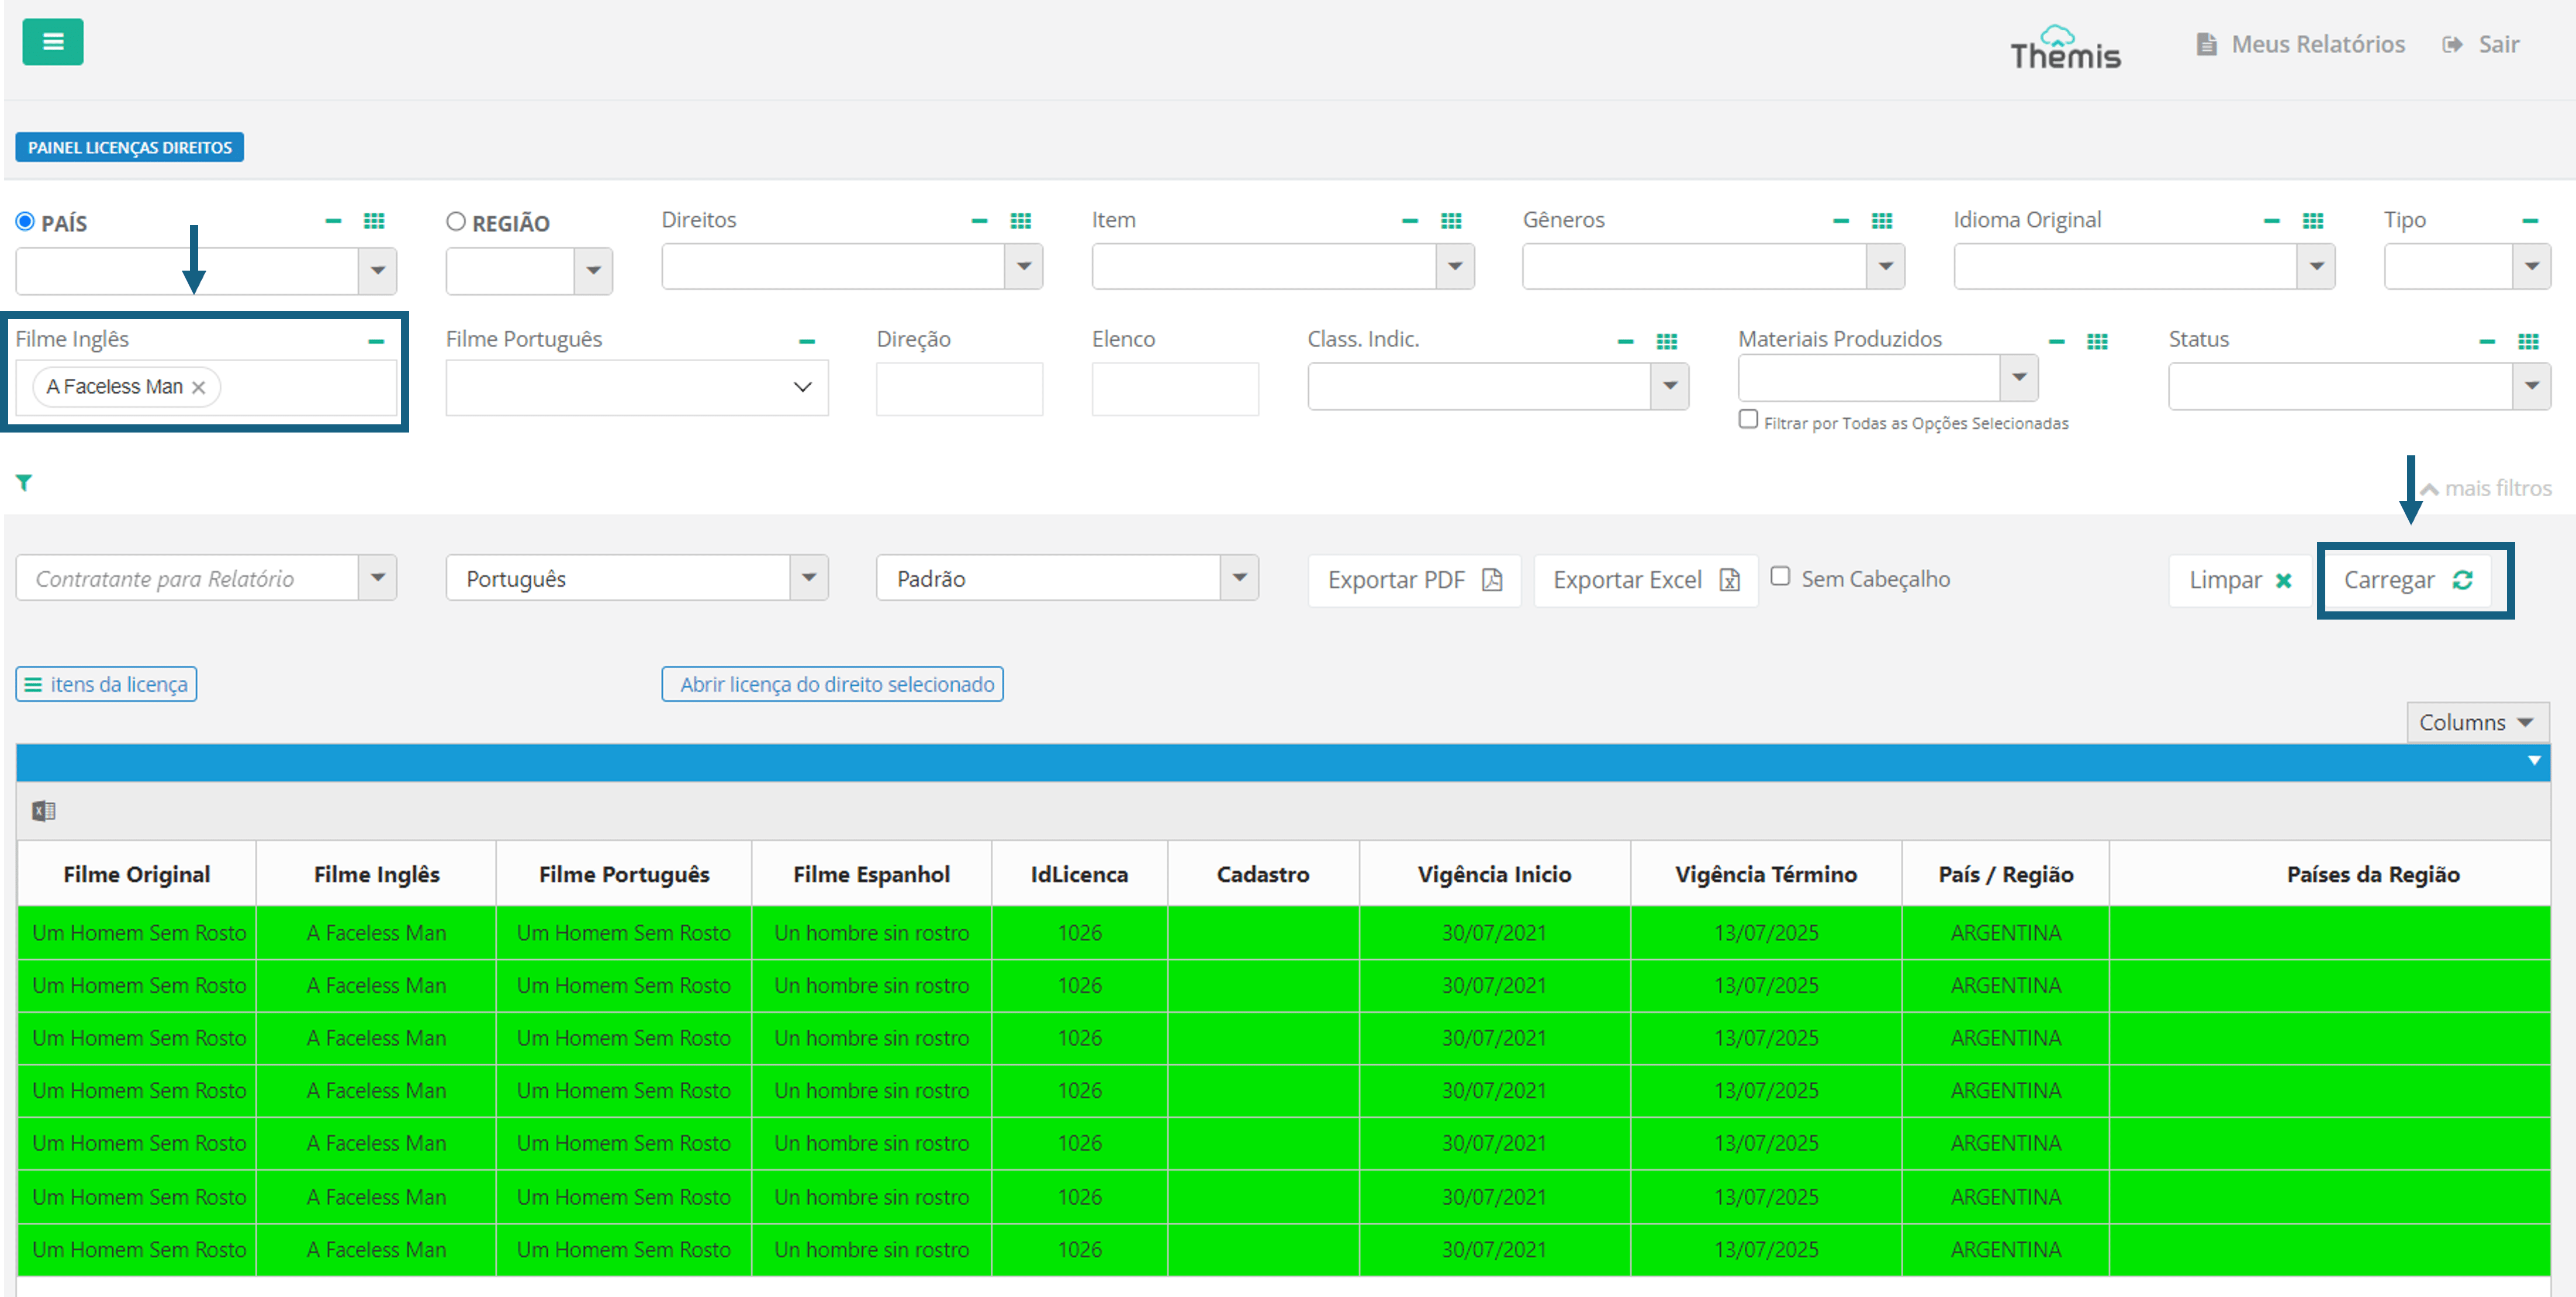
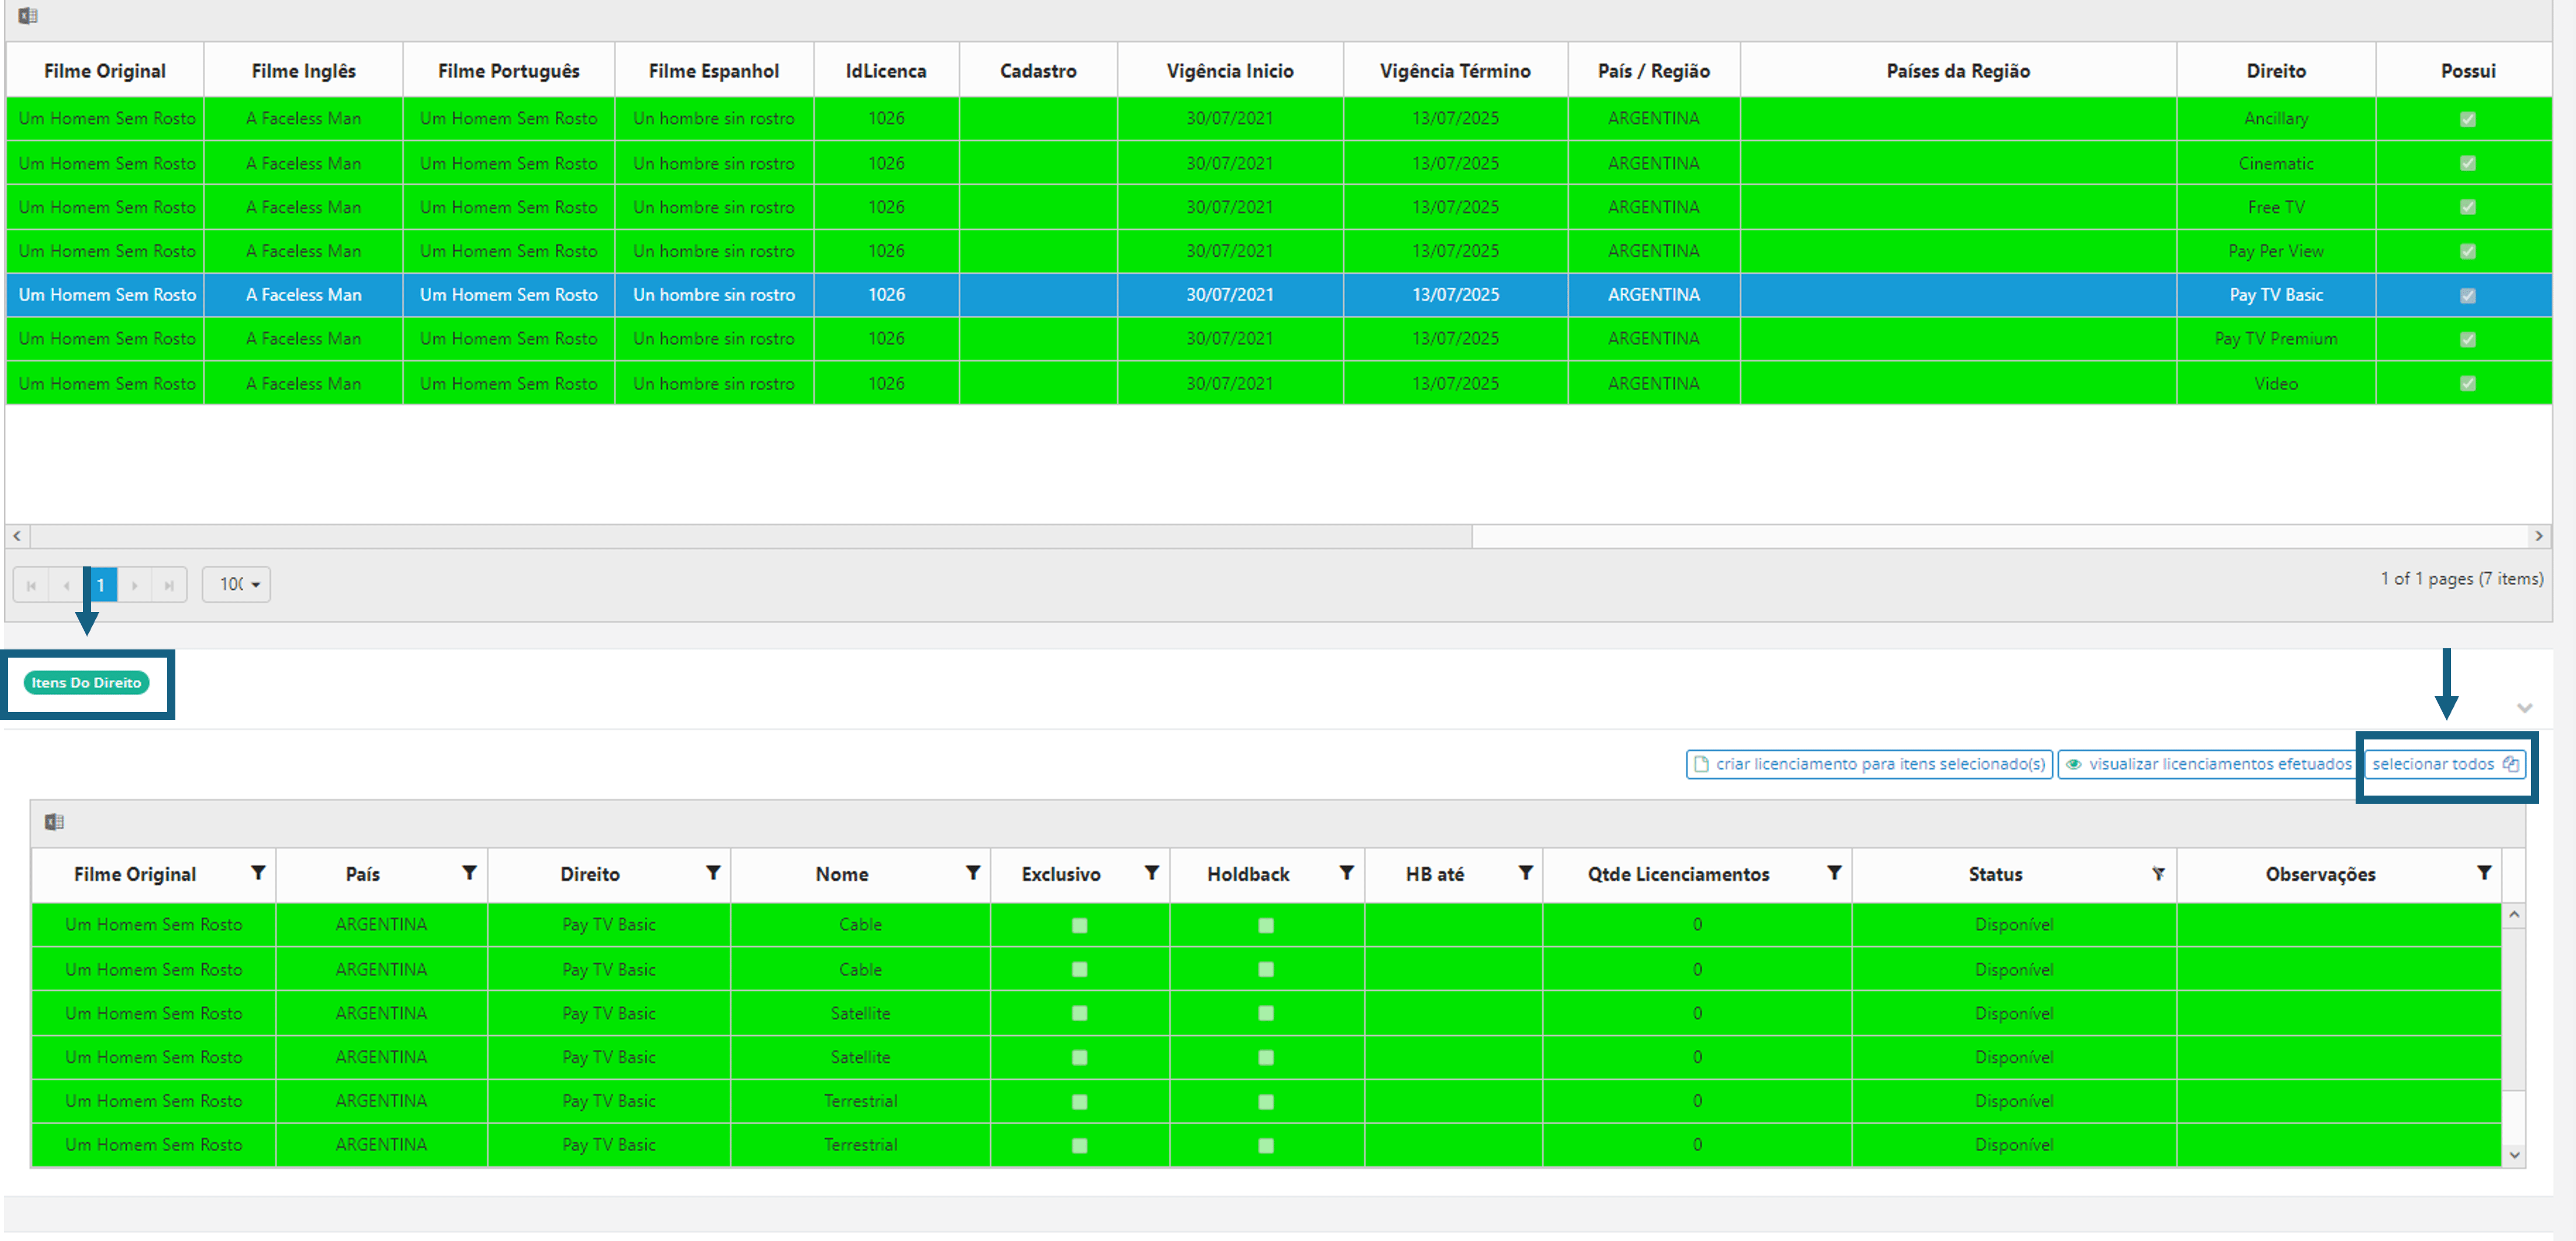
Once the list of Rights for the title is loaded, open the tab below labeled Rights ItemsSelect the right and then select all the right items for which you want to create the Licensing. You can hold down the "Ctrl" key to select multiple rights at once or click on "Select All."
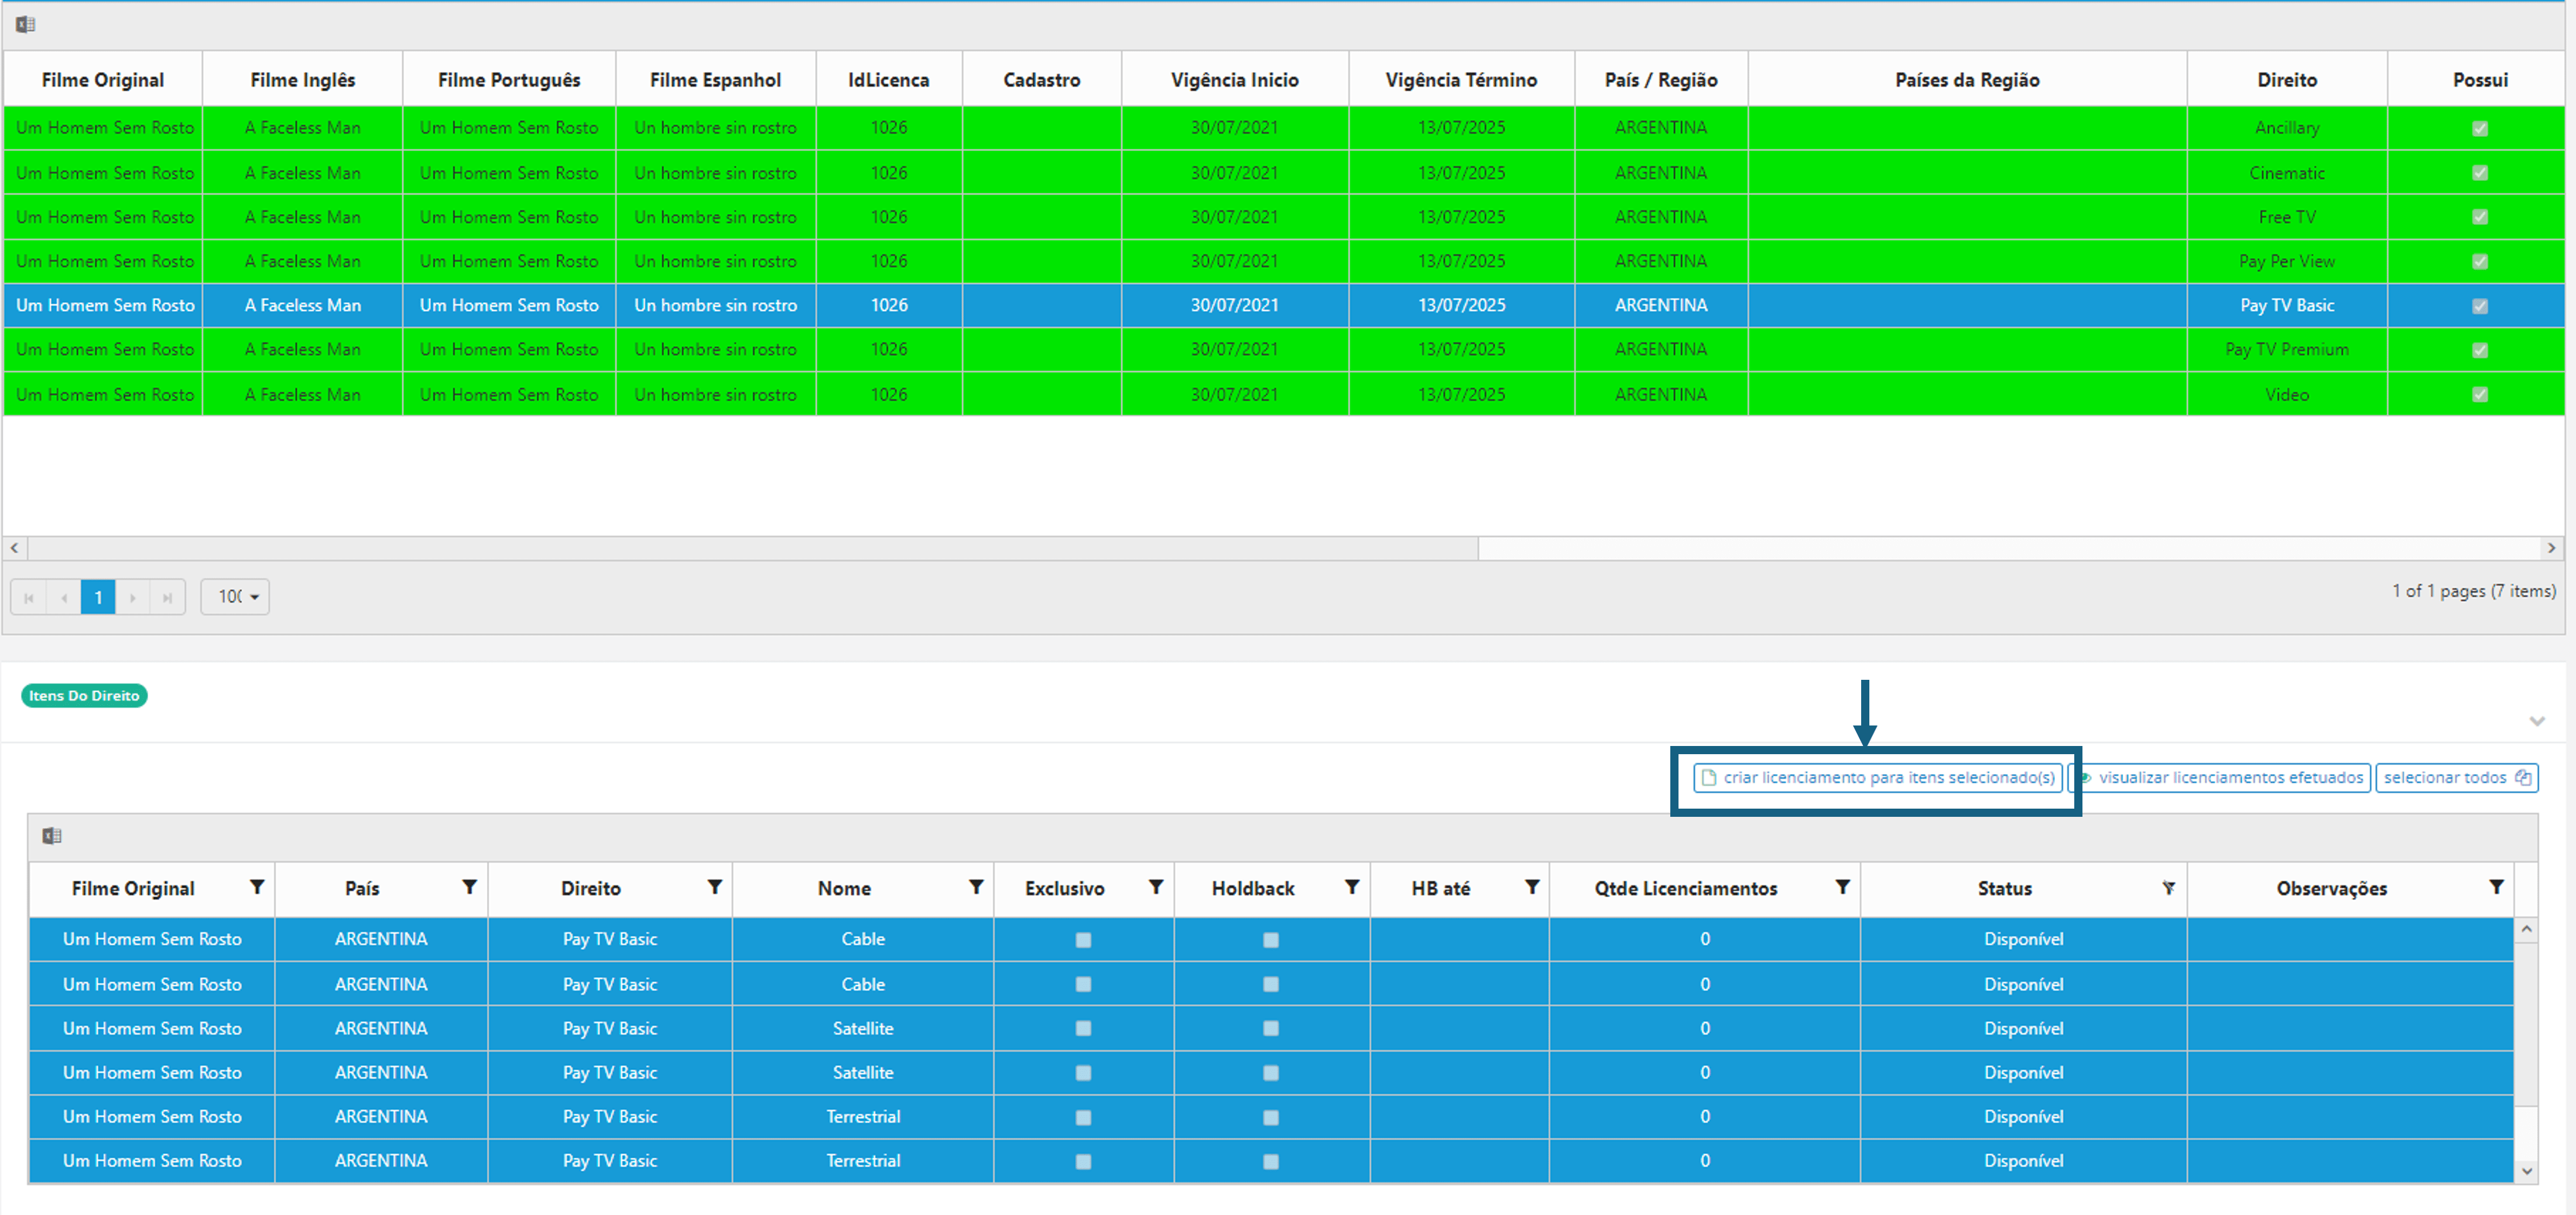
After selecting the rights items, click on the option **Create Licensing for Selected Items
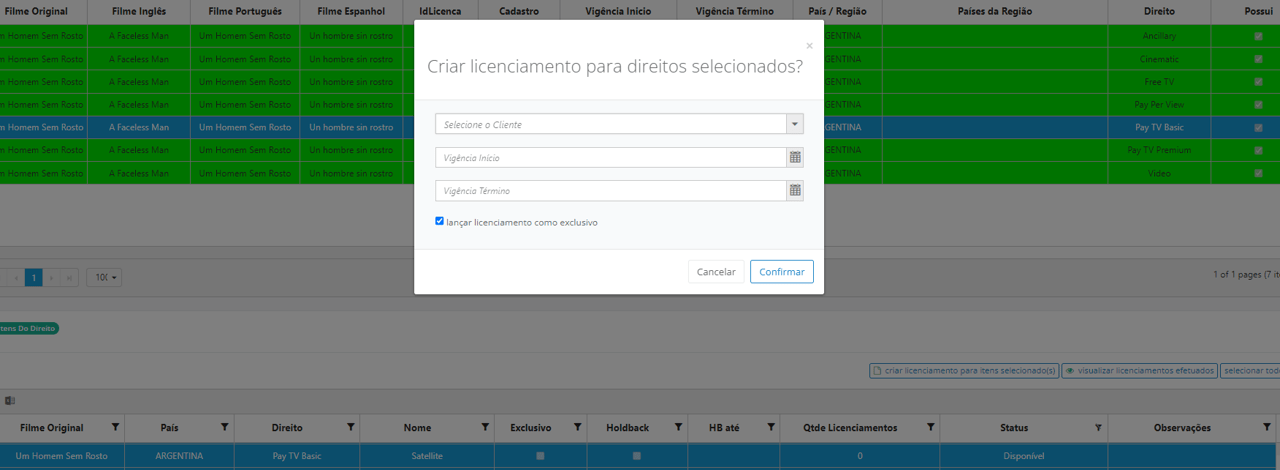
When opening the pop-up, fill in the Customer information and the start and end dates of the term. If it is an exclusive License, check the box “launch licensing as exclusive”.
Multiple Licensing
Access –> Menu -> Licensing
Note that we have added the Multiple Licensing Button to the Licensing screen:
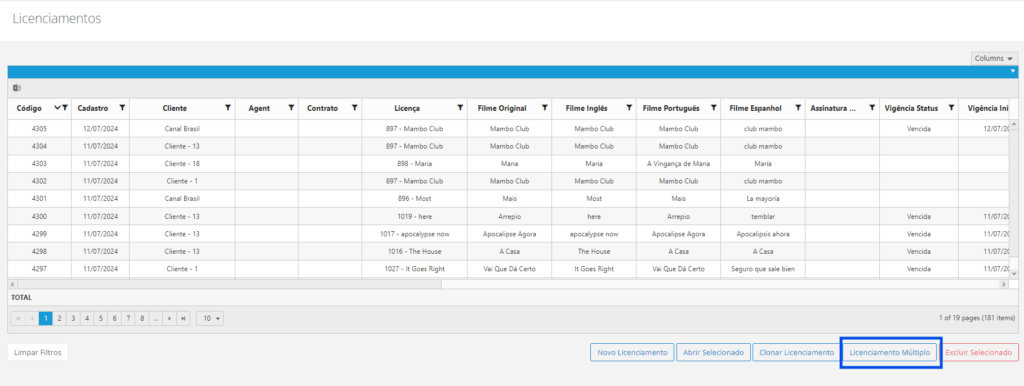
By clicking on Multiple Licensing, it will be possible to register multiple licensing models and from them, several licenses will be generated.
Step by step:
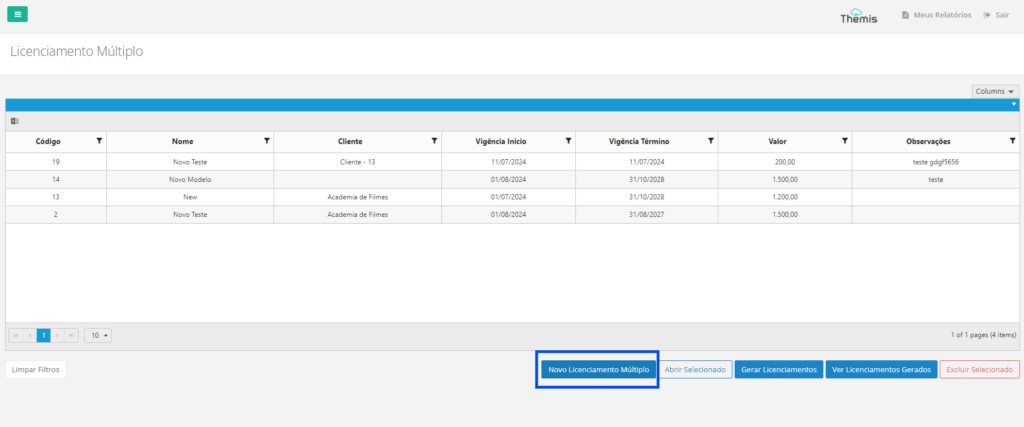
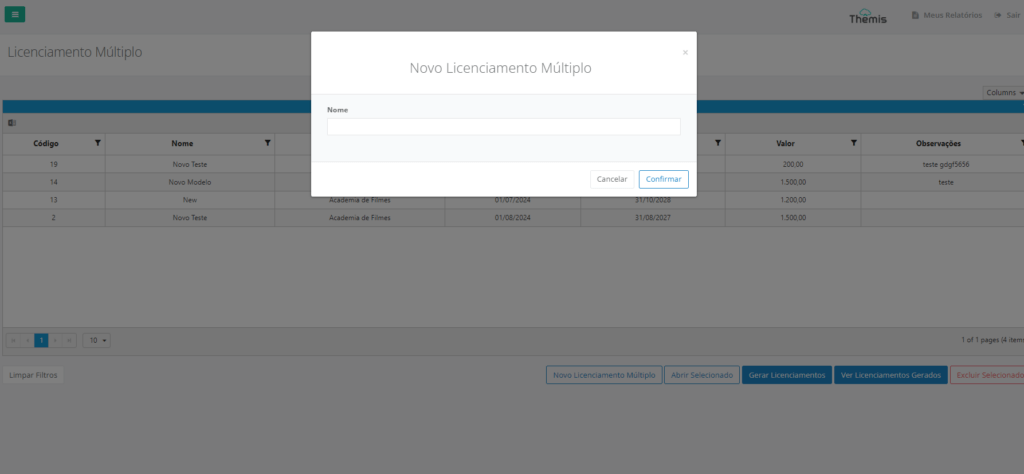
Click on Multiple Licensing – > New Multiple Licensing – You will be asked to define the licensing name, after entering the Name click on Confirm:
After confirming, the page with the information needed to register licensing will be loaded:
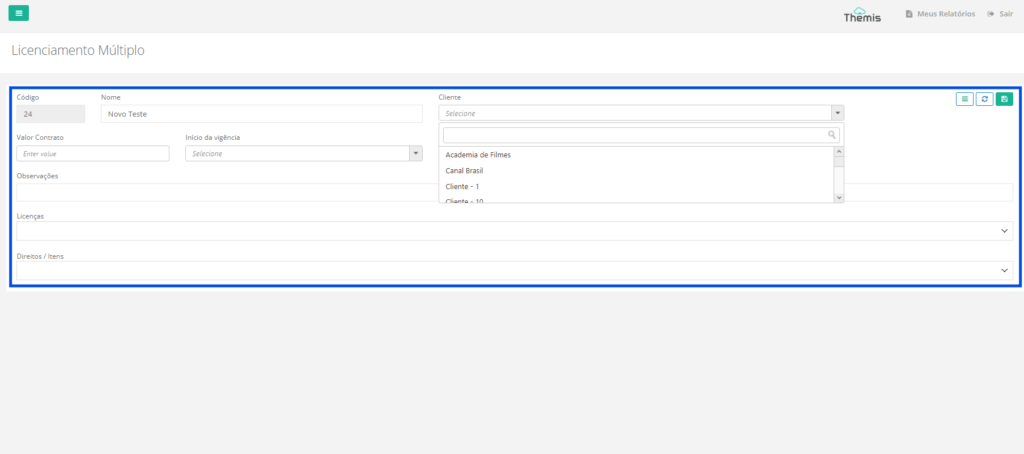
- Code: Automatically filled by the system without editing options.
- Name : Confirm that the client is correct;
- Client: Select the client.
- Contract Value: Fill in the contract value;
- Start of Duration: You can link the start of the Licensing term to one of the 5 available options: Signing of Deal Memo, Signing of Contract, Release of Holdback, Receipt of NOD or Other
- Duration Start: Confirm the start date of the licensing contract.
- Duration End: Confirm the end date of the licensing contract.
- Observations: Fill in any observations related to the Licensing.
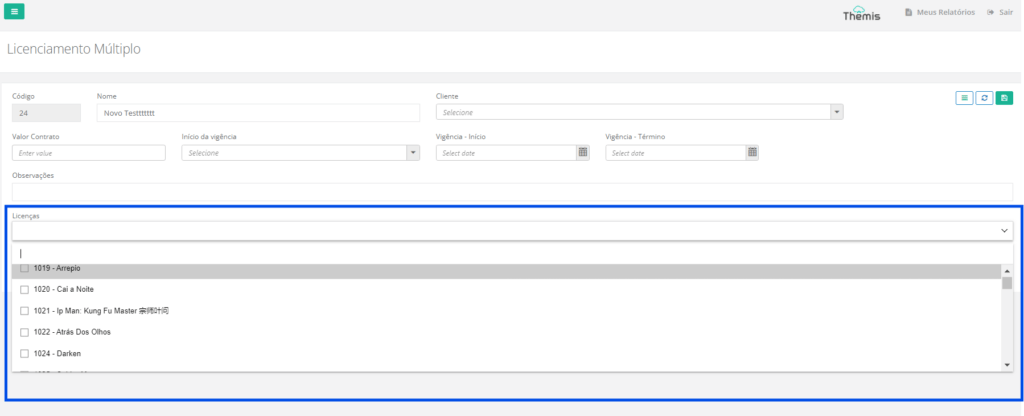
- Licenses : Titles are loaded to choose different titles and generate multiple licensing, see image below:
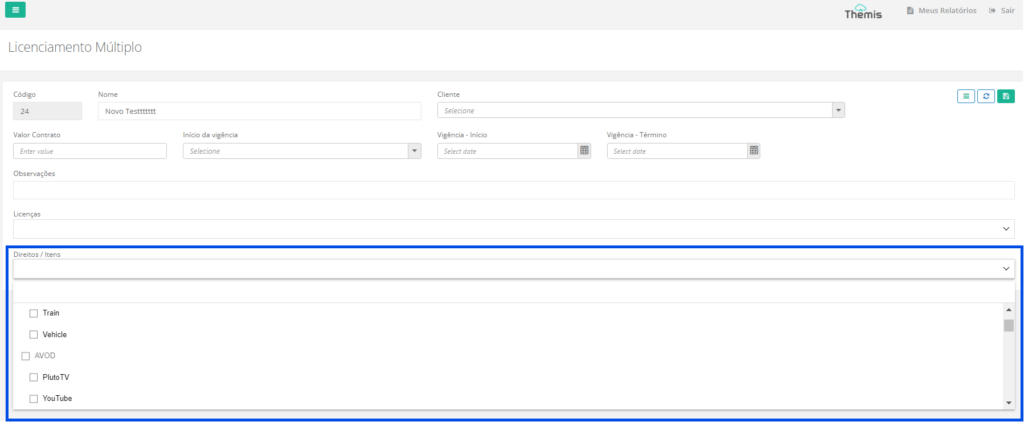
- Rights/Items: Choose the rights and items corresponding to the licenses, note that it is possible to select multiple rights and items:
After selecting the right items, click on the “Save” icon:

The panel shows a list of multiple licenses, just select and click on the generate licenses button, and confirm:
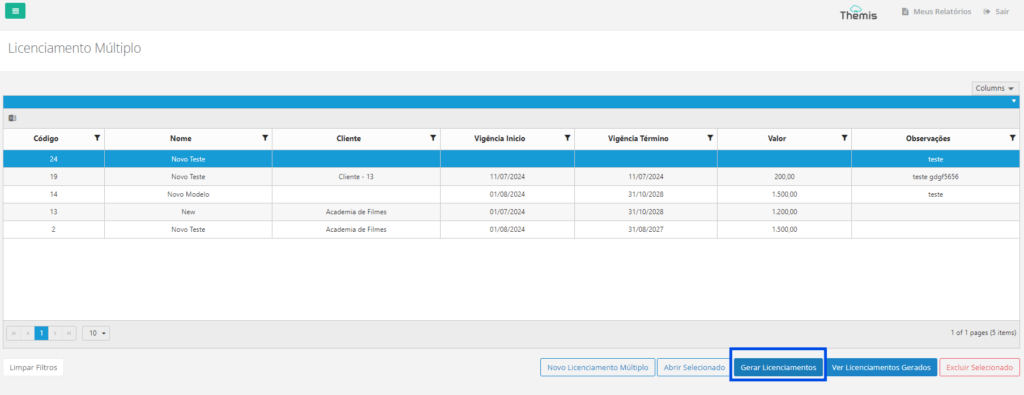
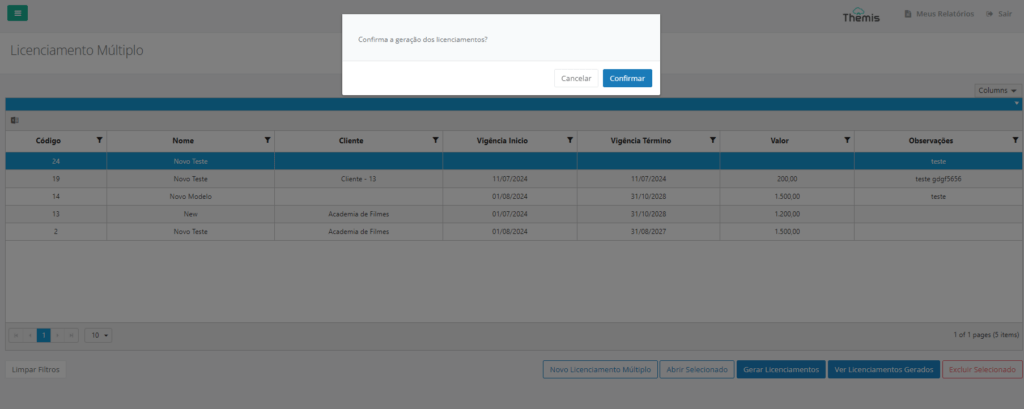
When confirming, Thêmis displays the success message and how many licenses were generated:
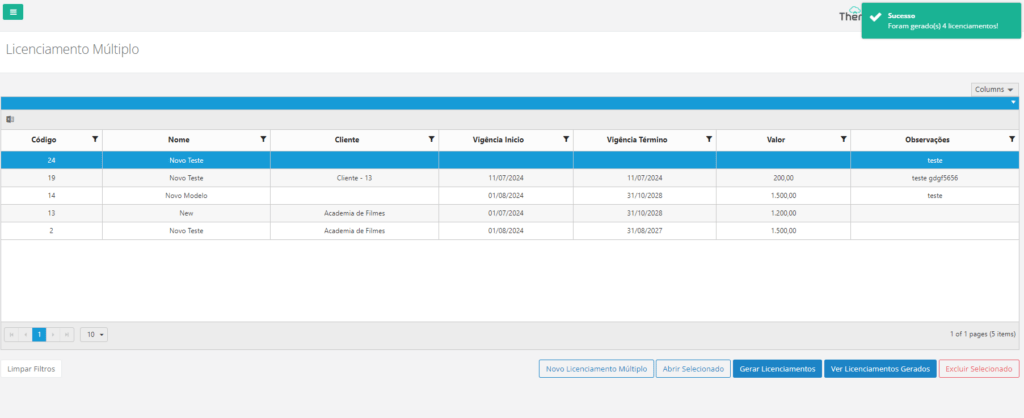
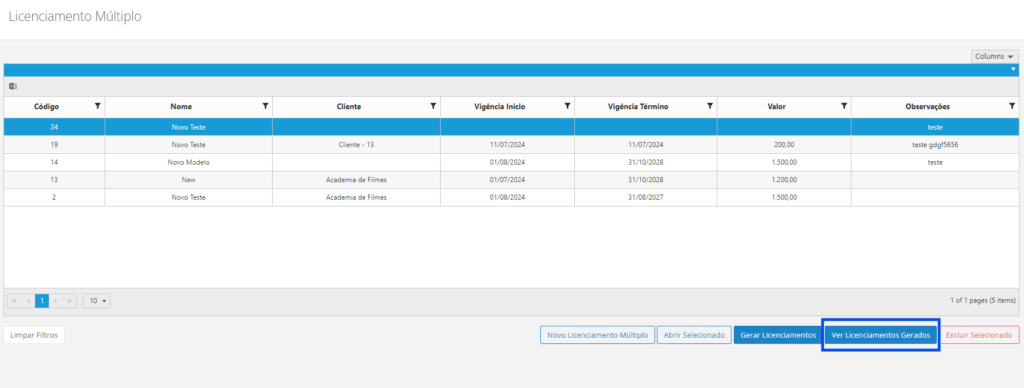
To view the generated licenses, click on the “view generated licenses” button:
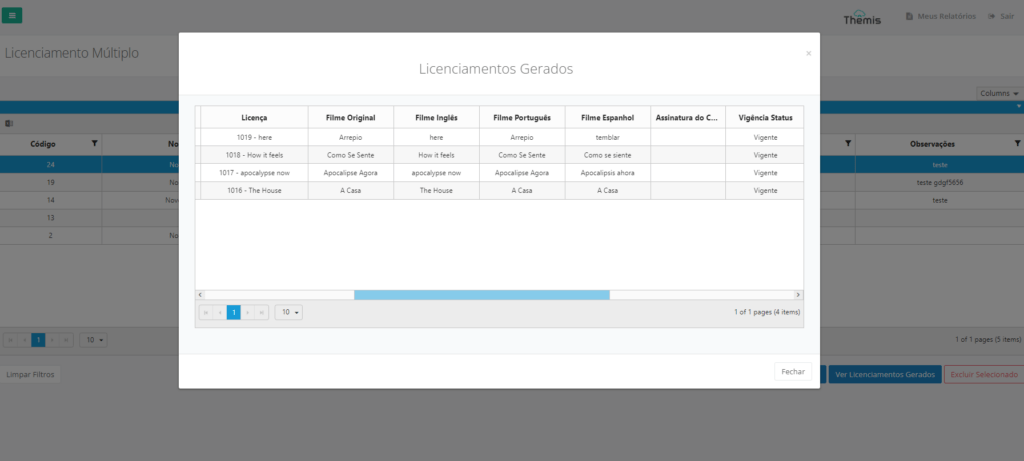
Licensing is displayed:
To access a single license, simply select the license you wish to view and double-click:
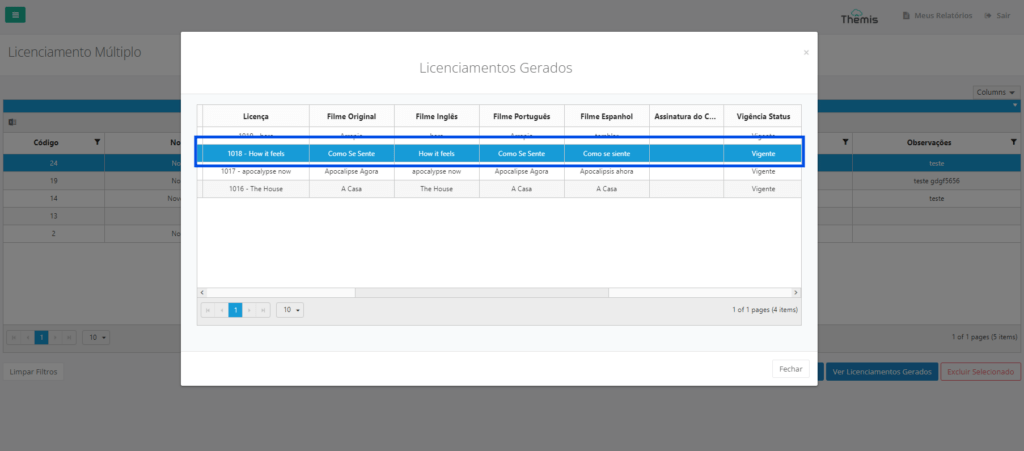
And you will be directed to the licensing you want to view:
